[!INCLUDEadding-model]
Note: The ASP.NET Core 2.0 templates contain the Models folder.
Right-click the Models folder > Add > Class. Name the class Movie and add the following properties:
[!code-csharpMain]
1: //#define MovieNoEF
2: #if MovieNoEF
3: #region snippet_1
4: using System;
5:
6: namespace MvcMovie.Models
7: {
8: public class Movie
9: {
10: public int ID { get; set; }
11: public string Title { get; set; }
12: public DateTime ReleaseDate { get; set; }
13: public string Genre { get; set; }
14: public decimal Price { get; set; }
15: }
16: }
17: #endregion
18: #endif
The ID field is required by the database for the primary key.
Build the project to verify you don’t have any errors. You now have a Model in your MVC app.
Scaffolding a controller
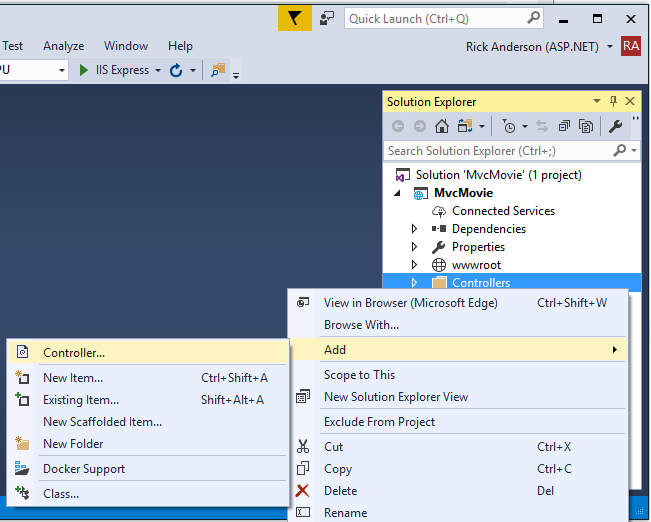
In Solution Explorer, right-click the Controllers folder > Add > Controller.
If the Add MVC Dependencies dialog appears:
- Update Visual Studio to the latest version. Visual Studio versions prior to 15.5 show this dialog.
- If you can’t update, select ADD, and then follow the add controller steps again.
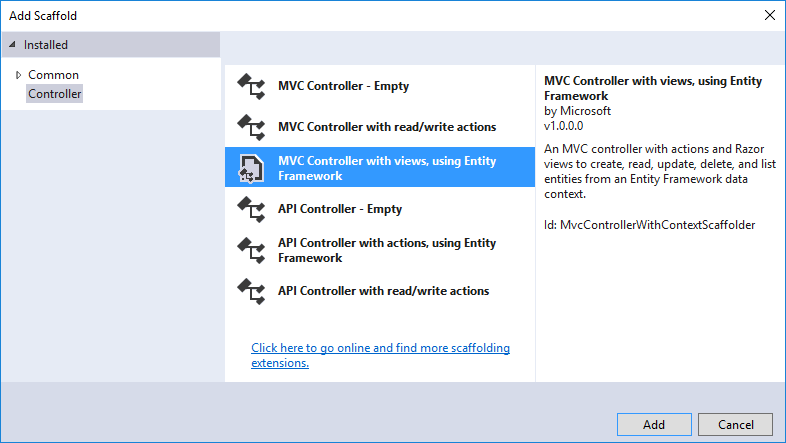
In the Add Scaffold dialog, tap MVC Controller with views, using Entity Framework > Add.
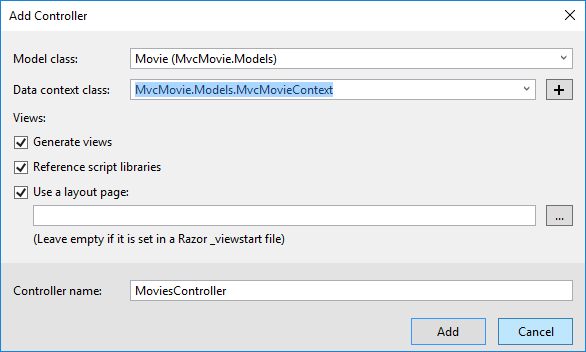
Complete the Add Controller dialog:
- Model class: Movie (MvcMovie.Models)
- Data context class: Select the + icon and add the default MvcMovie.Models.MvcMovieContext

- Views: Keep the default of each option checked
- Controller name: Keep the default MoviesController
- Tap Add
Visual Studio creates:
- An Entity Framework Core (xref:)database context class (Data/MvcMovieContext.cs)
- A movies controller (Controllers/MoviesController.cs)
- Razor view files for Create, Delete, Details, Edit, and Index pages (Views/Movies/*.cshtml)
The automatic creation of the database context and CRUD (create, read, update, and delete) action methods and views is known as scaffolding. You’ll soon have a fully functional web application that lets you manage a movie database.
If you run the app and click on the Mvc Movie link, you get an error similar to the following:
An unhandled exception occurred while processing the request.

SqlException: Cannot open database "MvcMovieContext-<GUID removed>" requested by the login. The login failed.
Login failed for user 'Rick'.

System.Data.SqlClient.SqlInternalConnectionTds..ctor(DbConnectionPoolIdentity identity, SqlConnectionString
You need to create the database, and you’ll use the EF Core (xref:)Migrations feature to do that. Migrations lets you create a database that matches your data model and update the database schema when your data model changes.
Add EF tooling and perform initial migration
In this section you’ll use the Package Manager Console (PMC) to:
- Add the Entity Framework Core Tools package. This package is required to add migrations and update the database.
- Add an initial migration.
- Update the database with the initial migration.
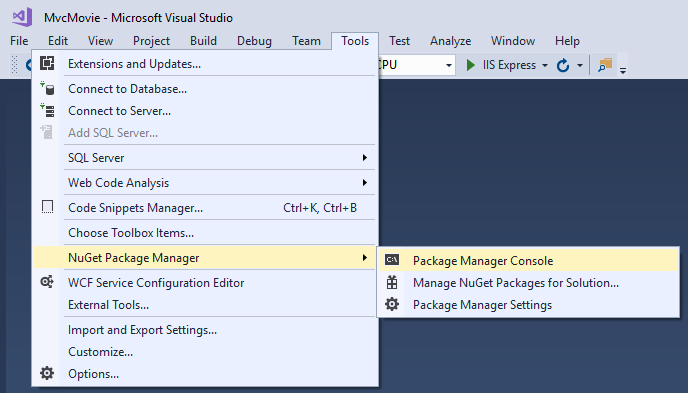
From the Tools menu, select NuGet Package Manager > Package Manager Console.
In the PMC, enter the following commands:
Install-Package Microsoft.EntityFrameworkCore.Tools
Add-Migration Initial
Update-Database
Note: If you receive an error with the Install-Package command, open NuGet Package Manager and search for the Microsoft.EntityFrameworkCore.Tools package. This allows you to install the package or check if it is already installed. Alternatively, see the CLI approach if you have problems with the PMC.
The Add-Migration command creates code to create the initial database schema. The schema is based on the model specified in the DbContext(In the Data/MvcMovieContext.cs file). The Initial argument is used to name the migrations. You can use any name, but by convention you choose a name that describes the migration. See (xref:)Introduction to migrations for more information.
The Update-Database command runs the Up method in the *Migrations/<time-stamp>_Initial.cs* file, which creates the database.
You can perform the preceeding steps using the command-line interface (CLI) rather than the PMC:
- Add (xref:)EF Core tooling to the .csproj file.
Run the following commands from the console (in the project directory):
dotnet ef migrations add Initial
dotnet ef database update
[!INCLUDEadding-model]
[!code-csharpMain]
1: #if V1x
2: using System;
3: using System.Collections.Generic;
4: using System.Linq;
5: using System.Threading.Tasks;
6: using Microsoft.AspNetCore.Builder;
7: using Microsoft.AspNetCore.Hosting;
8: using Microsoft.Extensions.Configuration;
9: using Microsoft.Extensions.DependencyInjection;
10: using Microsoft.Extensions.Logging;
11: using Microsoft.EntityFrameworkCore;
12: using MvcMovie.Models;
13:
14: namespace MvcMovie
15: {
16: public class Startup
17: {
18: public Startup(IHostingEnvironment env)
19: {
20: var builder = new ConfigurationBuilder()
21: .SetBasePath(env.ContentRootPath)
22: .AddJsonFile("appsettings.json", optional: false, reloadOnChange: true)
23: .AddJsonFile($"appsettings.{env.EnvironmentName}.json", optional: true)
24: .AddEnvironmentVariables();
25: Configuration = builder.Build();
26: }
27:
28: public IConfigurationRoot Configuration { get; }
29:
30: // This method gets called by the runtime. Use this method to add services to the container.
31: #region ConfigureServices
32: public void ConfigureServices(IServiceCollection services)
33: {
34: // Add framework services.
35: services.AddMvc();
36:
37: services.AddDbContext<MvcMovieContext>(options =>
38: options.UseSqlServer(Configuration.GetConnectionString("MvcMovieContext")));
39: }
40: #endregion
41:
42:
43: // This method gets called by the runtime. Use this method to configure the HTTP request pipeline.
44: public void Configure(IApplicationBuilder app, IHostingEnvironment env, ILoggerFactory loggerFactory)
45: {
46: loggerFactory.AddConsole(Configuration.GetSection("Logging"));
47: loggerFactory.AddDebug();
48:
49: if (env.IsDevelopment())
50: {
51: app.UseDeveloperExceptionPage();
52:
53: // Browser Link is not compatible with Kestrel 1.1.0
54: // For details on enabling Browser Link, see https://go.microsoft.com/fwlink/?linkid=840936
55: // app.UseBrowserLink();
56: }
57: else
58: {
59: app.UseExceptionHandler("/Home/Error");
60: }
61:
62: #region snippet_seed
63: app.UseStaticFiles();
64: #region snippet_1
65: app.UseMvc(routes =>
66: {
67: routes.MapRoute(
68: name: "default",
69: template: "{controller=Home}/{action=Index}/{id?}");
70: });
71: #endregion
72:
73: SeedData.Initialize(app.ApplicationServices);
74: }
75: }
76: }
77: #endregion
78: #endif
[!INCLUDEadding-model]
Additional resources
 )
)
|
|