Calling an OData Service From a .NET Client (C#)
by Mike Wasson
This tutorial shows how to call an OData service from a C# client application.
Software versions used in the tutorial
- Visual Studio 2013 (works with Visual Studio 2012)
- WCF Data Services Client Library
- Web API 2. (The example OData service is built using Web API 2, but the client application does not depend on Web API.)
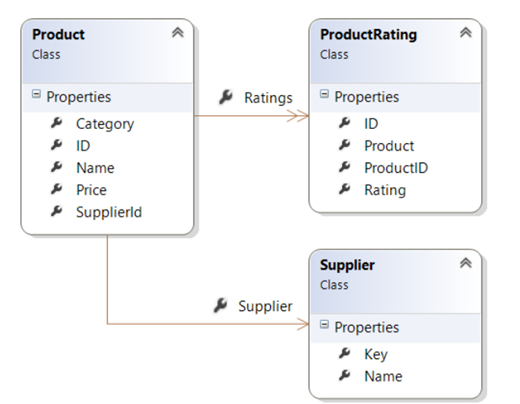
In this tutorial, I’ll walk through creating a client application that calls an OData service. The OData service exposes the following entities:
ProductSupplierProductRating
The following articles describe how to implement the OData service in Web API. (You don’t need to read them to understand this tutorial, however.)
- Creating an OData Endpoint in Web API 2
- OData Entity Relations in Web API 2
- OData Actions in Web API 2
Generate the Service Proxy
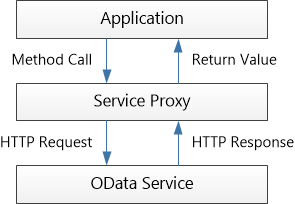
The first step is to generate a service proxy. The service proxy is a .NET class that defines methods for accessing the OData service. The proxy translates method calls into HTTP requests.
Start by opening the OData service project in Visual Studio. Press CTRL+F5 to run the service locally in IIS Express. Note the local address, including the port number that Visual Studio assigns. You will need this address when you create the proxy.
Next, open another instance of Visual Studio and create a console application project. The console application will be our OData client application. (You can also add the project to the same solution as the service.)
[!NOTE] The remaining steps refer the console project.
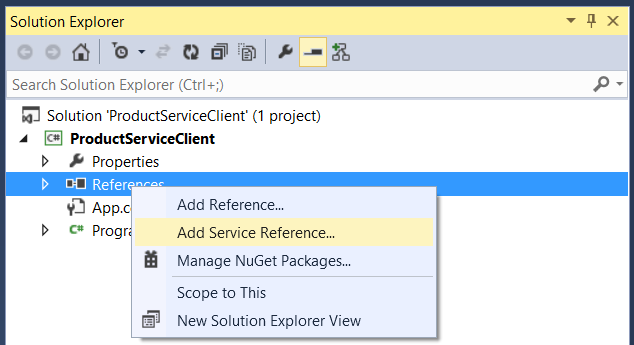
In Solution Explorer, right-click References and select Add Service Reference.
In the Add Service Reference dialog, type the address of the OData service:
[!code-consoleMain]
1: http://localhost:port/odata
where port is the port number.
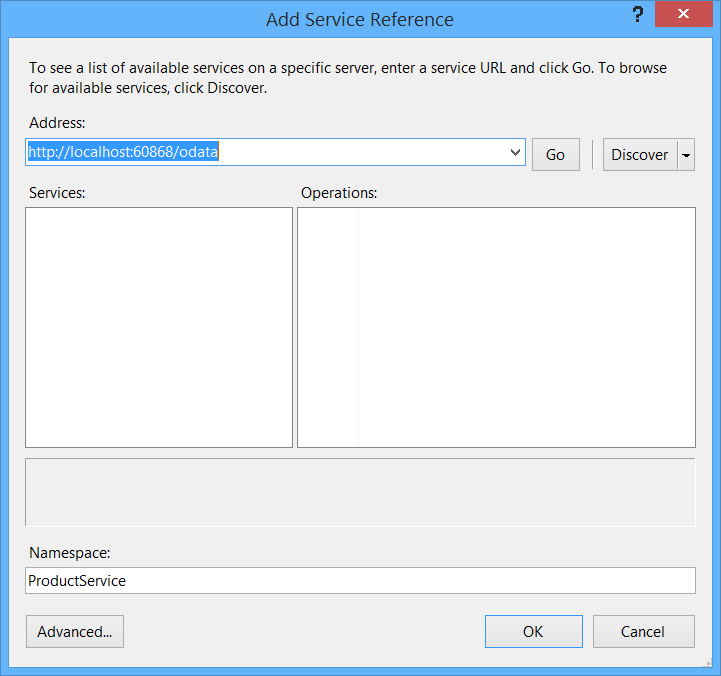
For Namespace, type “ProductService”. This option defines the namespace of the proxy class.
Click Go. Visual Studio reads the OData metadata document to discover the entities in the service.
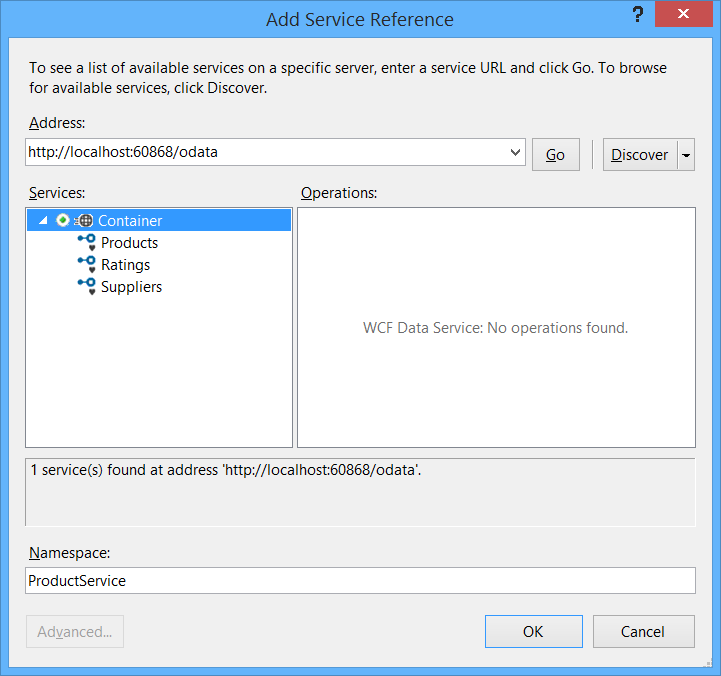
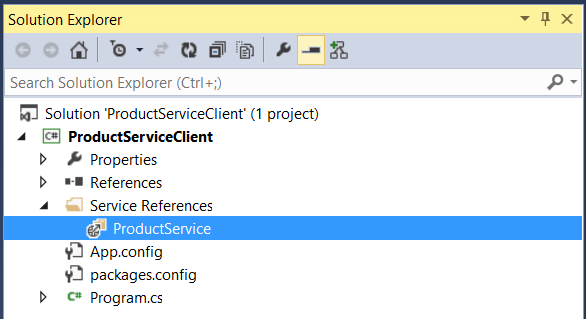
Click OK to add the proxy class to your project.
Create an Instance of the Service Proxy Class
Inside your Main method, create a new instance of the proxy class, as follows:
[!code-csharpMain]
1: using System;
2: using System.Data.Services.Client;
3: using System.Linq;
4:
5: namespace Client
6: {
7: class Program
8: {
9: static void Main(string[] args)
10: {
11: Uri uri = new Uri("http://localhost:1234/odata/");
12: var container = new ProductService.Container(uri);
13:
14: // ...
15: }
16: }
17: }
Again, use the actual port number where your service is running. When you deploy your service, you will use the URI of the live service. You don’t need to update the proxy.
The following code adds an event handler that prints the request URIs to the console window. This step isn’t required, but it’s interesting to see the URIs for each query.
[!code-csharpMain]
1: container.SendingRequest2 += (s, e) =>
2: {
3: Console.WriteLine("{0} {1}", e.RequestMessage.Method, e.RequestMessage.Url);
4: };
Query the Service
The following code gets the list of products from the OData service.
[!code-csharpMain]
1: class Program
2: {
3: static void DisplayProduct(ProductService.Product product)
4: {
5: Console.WriteLine("{0} {1} {2}", product.Name, product.Price, product.Category);
6: }
7:
8: // Get an entire entity set.
9: static void ListAllProducts(ProductService.Container container)
10: {
11: foreach (var p in container.Products)
12: {
13: DisplayProduct(p);
14: }
15: }
16:
17: static void Main(string[] args)
18: {
19: Uri uri = new Uri("http://localhost:18285/odata/");
20: var container = new ProductService.Container(uri);
21: container.SendingRequest2 += (s, e) =>
22: {
23: Console.WriteLine("{0} {1}", e.RequestMessage.Method, e.RequestMessage.Url);
24: };
25:
26: // Get the list of products
27: ListAllProducts(container);
28: }
29: }
Notice that you don’t need to write any code to send the HTTP request or parse the response. The proxy class does this automatically when you enumerate the Container.Products collection in the foreach loop.
When you run the application, the output should look like the following:
[!code-consoleMain]
1: GET http://localhost:60868/odata/Products
2: Hat 15.00 Apparel
3: Scarf 12.00 Apparel
4: Socks 5.00 Apparel
5: Yo-yo 4.95 Toys
6: Puzzle 8.00 Toys
To get an entity by ID, use a where clause.
[!code-csharpMain]
1: // Get a single entity.
2: static void ListProductById(ProductService.Container container, int id)
3: {
4: var product = container.Products.Where(p => p.ID == id).SingleOrDefault();
5: if (product != null)
6: {
7: DisplayProduct(product);
8: }
9: }
For the rest of this topic, I won’t show the entire Main function, just the code needed to call the service.
Apply Query Options
OData defines query options that can be used to filter, sort, page data, and so forth. In the service proxy, you can apply these options by using various LINQ expressions.
In this section, I’ll show brief examples. For more details, see the topic LINQ Considerations (WCF Data Services) on MSDN.
Filtering ($filter)
To filter, use a where clause. The following example filters by product category.
[!code-csharpMain]
1: // Use the $filter option.
2: static void ListProductsInCategory(ProductService.Container container, string category)
3: {
4: var products =
5: from p in container.Products
6: where p.Category == category
7: select p;
8: foreach (var p in products)
9: {
10: DisplayProduct(p);
11: }
12: }
This code corresponds to the following OData query.
[!code-consoleMain]
1: GET http://localhost/odata/Products()?$filter=Category eq 'apparel'
Notice that the proxy converts the where clause into an OData $filter expression.
Sorting ($orderby)
To sort, use an orderby clause. The following example sorts by price, from highest to lowest.
[!code-csharpMain]
1: // Use the $orderby option
2: static void ListProductsSorted(ProductService.Container container)
3: {
4: // Sort by price, highest to lowest.
5: var products =
6: from p in container.Products
7: orderby p.Price descending
8: select p;
9:
10: foreach (var p in products)
11: {
12: DisplayProduct(p);
13: }
14: }
Here is the corresponding OData request.
[!code-consoleMain]
1: GET http://localhost/odata/Products()?$orderby=Price desc
Client-Side Paging ($skip and $top)
For large entity sets, the client might want to limit the number of results. For example, a client might show 10 entries at a time. This is called client-side paging. (There is also server-side paging, where the server limits the number of results.) To perform client-side paging, use the LINQ Skip and Take methods. The following example skips the first 40 results and takes the next 10.
[!code-csharpMain]
1: // Use $skip and $top options.
2: static void ListProductsPaged(ProductService.Container container)
3: {
4: var products =
5: (from p in container.Products
6: orderby p.Price descending
7: select p).Skip(40).Take(10);
8:
9: foreach (var p in products)
10: {
11: DisplayProduct(p);
12: }
13: }
Here is the corresponding OData request:
[!code-consoleMain]
1: GET http://localhost/odata/Products()?$orderby=Price desc&$skip=40&$top=10
Select (select)andExpand(expand)
To include related entities, use the DataServiceQuery<t>.Expand method. For example, to include the Supplier for each Product:
[!code-csharpMain]
1: // Use the $expand option.
2: static void ListProductsAndSupplier(ProductService.Container container)
3: {
4: var products = container.Products.Expand(p => p.Supplier);
5: foreach (var p in products)
6: {
7: Console.WriteLine("{0}\t{1}\t{2}", p.Name, p.Price, p.Supplier.Name);
8: }
9: }
Here is the corresponding OData request:
[!code-consoleMain]
1: GET http://localhost/odata/Products()?$expand=Supplier
To change the shape of the response, use the LINQ select clause. The following example gets just the name of each product, with no other properties.
[!code-csharpMain]
1: // Use the $select option.
2: static void ListProductNames(ProductService.Container container)
3: {
4:
5: var products = from p in container.Products select new { Name = p.Name };
6: foreach (var p in products)
7: {
8: Console.WriteLine(p.Name);
9: }
10: }
Here is the corresponding OData request:
[!code-consoleMain]
1: GET http://localhost/odata/Products()?$select=Name
A select clause can include related entities. In that case, do not call Expand; the proxy automatically includes the expansion in this case. The following example gets the name and supplier of each product.
[!code-csharpMain]
1: // Use $expand and $select options
2: static void ListProductNameSupplier(ProductService.Container container)
3: {
4: var products =
5: from p in container.Products
6: select new
7: {
8: Name = p.Name,
9: Supplier = p.Supplier.Name
10: };
11: foreach (var p in products)
12: {
13: Console.WriteLine("{0}\t{1}", p.Name, p.Supplier);
14: }
15: }
Here is the corresponding OData request. Notice that it includes the $expand option.
[!code-consoleMain]
1: GET http://localhost/odata/Products()?$expand=Supplier&$select=Name,Supplier/Name
For more information about $select and $expand, see Using $select, $expand, and $value in Web API 2.
Add a New Entity
To add a new entity to an entity set, call AddToEntitySet, where EntitySet is the name of the entity set. For example, AddToProducts adds a new Product to the Products entity set. When you generate the proxy, WCF Data Services automatically creates these strongly-typed AddTo methods.
[!code-csharpMain]
1: // Add an entity.
2: static void AddProduct(ProductService.Container container, ProductService.Product product)
3: {
4: container.AddToProducts(product);
5: var serviceResponse = container.SaveChanges();
6: foreach (var operationResponse in serviceResponse)
7: {
8: Console.WriteLine(operationResponse.StatusCode);
9: }
10: }
To add a link between two entities, use the AddLink and SetLink methods. The following code adds a new supplier and a new product, and then creates links between them.
[!code-csharpMain]
1: // Add entities with links.
2: static void AddProductWithSupplier(ProductService.Container container,
3: ProductService.Product product, ProductService.Supplier supplier)
4: {
5: container.AddToSuppliers(supplier);
6: container.AddToProducts(product);
7: container.AddLink(supplier, "Products", product);
8: container.SetLink(product, "Supplier", supplier);
9: var serviceResponse = container.SaveChanges();
10: foreach (var operationResponse in serviceResponse)
11: {
12: Console.WriteLine(operationResponse.StatusCode);
13: }
14: }
Use AddLink when the navigation property is a collection. In this example, we are adding a product to the Products collection on the supplier.
Use SetLink when the navigation property is a single entity. In this example, we are setting the Supplier property on the product.
Update / Patch
To update an entity, call the UpdateObject method.
[!code-csharpMain]
1: static void UpdatePrice(ProductService.Container container, int id, decimal price)
2: {
3: var product = container.Products.Where(p => p.ID == id).SingleOrDefault();
4: if (product != null)
5: {
6: product.Price = price;
7: container.UpdateObject(product);
8: container.SaveChanges(SaveChangesOptions.PatchOnUpdate);
9: }
10: }
The update is performed when you call SaveChanges. By default, WCF sends an HTTP MERGE request. The PatchOnUpdate option tells WCF to send an HTTP PATCH instead.
[!NOTE] Why PATCH versus MERGE? The original HTTP 1.1 specification (RCF 2616) did not define any HTTP method with “partial update” semantics. To support partial updates, the OData specification defined the MERGE method. In 2010, RFC 5789 defined the PATCH method for partial updates. You can read some of the history in this blog post on the WCF Data Services Blog. Today, PATCH is preferred over MERGE. The OData controller created by the Web API scaffolding supports both methods.
If you want to replace the entire entity (PUT semantics), specify the ReplaceOnUpdate option. This causes WCF to send an HTTP PUT request.
[!code-csharpMain]
1: container.SaveChanges(SaveChangesOptions.ReplaceOnUpdate);
Delete an Entity
To delete an entity, call DeleteObject.
[!code-csharpMain]
1: static void DeleteProduct(ProductService.Container container, int id)
2: {
3: var product = container.Products.Where(p => p.ID == id).SingleOrDefault();
4: if (product != null)
5: {
6: container.DeleteObject(product);
7: container.SaveChanges();
8: }
9: }
Invoke an OData Action
In OData, actions are a way to add server-side behaviors that are not easily defined as CRUD operations on entities.
Although the OData metadata document describes the actions, the proxy class does not create any strongly-typed methods for them. You can still invoke an OData action by using the generic Execute method. However, you will need to know the data types of the parameters and the return value.
For example, the RateProduct action takes parameter named “Rating” of type Int32 and returns a double. The following code shows how to invoke this action.
[!code-csharpMain]
1: int rating = 2;
2: Uri actionUri = new Uri(uri, "Products(5)/RateProduct");
3: var averageRating = container.Execute<double>(
4: actionUri, "POST", true, new BodyOperationParameter("Rating", rating)).First();
For more information, seeCalling Service Operations and Actions.
One option is to extend the Container class to provide a strongly typed method that invokes the action:
[!code-csharpMain]
1: namespace ProductServiceClient.ProductService
2: {
3: public partial class Container
4: {
5: public double RateProduct(int productID, int rating)
6: {
7: Uri actionUri = new Uri(this.BaseUri,
8: String.Format("Products({0})/RateProduct", productID)
9: );
10:
11: return this.Execute<double>(actionUri,
12: "POST", true, new BodyOperationParameter("Rating", rating)).First();
13: }
14: }
15: }
 )
)
|
|