Using the HTML5 and jQuery UI Datepicker Popup Calendar with ASP.NET MVC - Part 2
This tutorial will teach you the basics of how to work with editor templates, display templates, and the jQuery UI datepicker popup calendar in an ASP.NET MVC Web application.
Adding an Automatic DateTime Template
In the first part of this tutorial, you saw how you can add attributes to the model to explicitly specify formatting, and how you can explicitly specify the template that’s used to render the model. For example, the DisplayFormat attribute in the following code explicity specifies the formatting for the ReleaseDate property.
[!code-csharpMain]
1: [DisplayFormat(DataFormatString = "{0:d}")]
2: public DateTime ReleaseDate { get; set; }
In the following example, the DataType attribute, using the Date enumeration, specifies that the date template should be used to render the model. If there’s no date template in your project, the built-in date template is used.
[!code-csharpMain]
1: [DataType(DataType.Date)]
2: public DateTime ReleaseDate { get; set; }
However, ASP.MVC can perform type matching using convention-over-configuration, by looking for a template that matches the name of a type. This lets you create a template that automatically formats data without using any attributes or code at all. For this part of the tutorial, you’ll create a template that’s automatically applied to model properties of type DateTime. You won’t need to use an attribute or other configuration to specify that the template should be used to render all model properties of type DateTime.
You’ll also learn a way to customize the display of individual properties or even individual fields.
To begin, let’s remove existing formatting information and display full dates in the application.
Open the Movie.cs file and comment out the DataType attribute on the ReleaseDate property:
[!code-csharpMain]
1: // [DataType(DataType.Date)]
2: public DateTime ReleaseDate { get; set; }
Press CTRL+F5 to run the application.
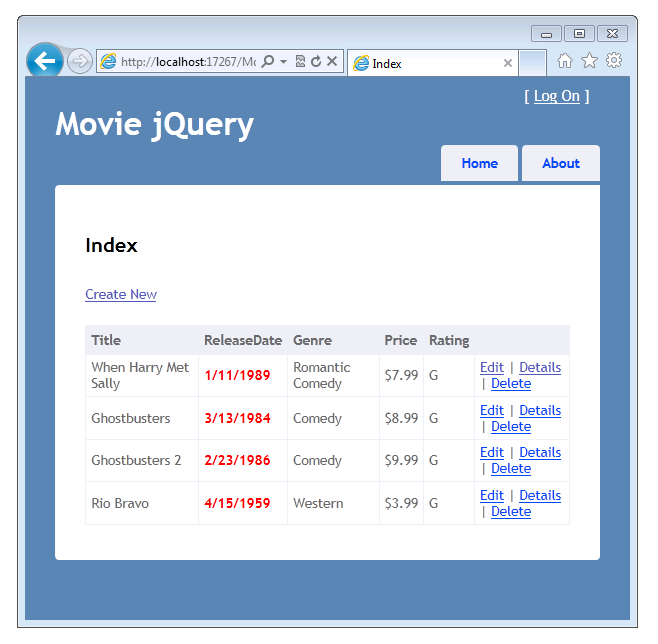
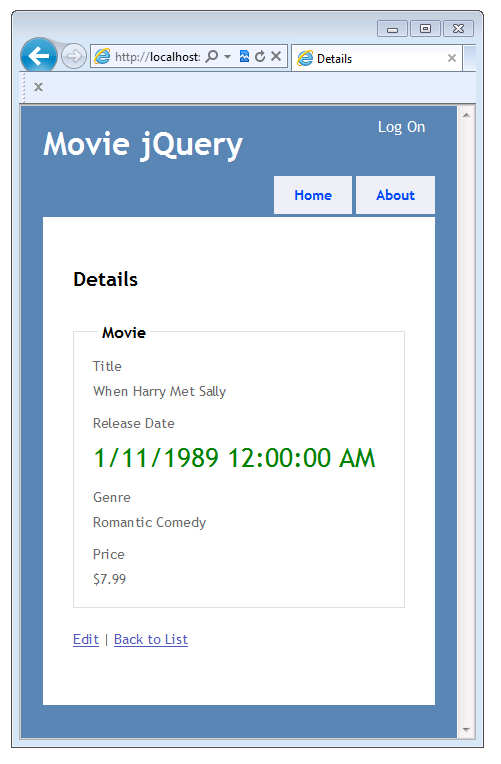
Notice that the ReleaseDate property now displays both the date and time, because that’s the default when no formatting information is provided.

Adding CSS Styles for Testing New Templates
Before you create a template for formatting dates, you’ll add a few CSS style rules that you can apply to the new templates. These will help you verify that the rendered page is using the new template.
Open the Content.css file and add the following CSS rules to the bottom of the file:
[!code-cssMain]
1: /* Styles to test new editor and display templates.
2: ----------------------------------------------------------*/
3: .loud-1 {
4: font-weight: bold;
5: color: Red;
6: }
7: .loud-2 {
8: font-size: 2.0em;
9: color:Green;
10: }
11: .loud-3 {
12: font-style: italic;
13: color: yellow;
14: background-color: blue;
15: }
Adding DateTime Display Templates
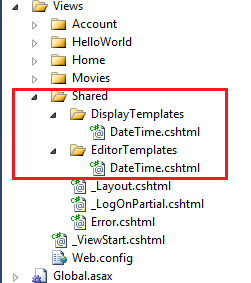
Now you can create the new template. In the Viewsfolder, create a DisplayTemplates* folder.
In the Viewsfolder, create a DisplayTemplates* folder and an EditorTemplates folder.
The display templates in the Viewsfolder will be used by all controllers. The display templates in the Viewsfolder will be used only by the Movie controller. (If a template with the same name appears in both folders, the template in the *Viewsfolder — that is, the more specific template — takes precedence for views returned by the Movie controller.)
In Solution Explorer, expand the Views folder, expand the Shared folder, and then right-click the *Viewsfolder.
Click Add and then click View. The Add View dialog box is displayed.
In the View name box, type DateTime. (You must use this name in order to match the name of the type.)
Select the Create as a partial view check box. Make sure that the Use a layout or master page and Create a strongly-typed view check boxes are not selected.
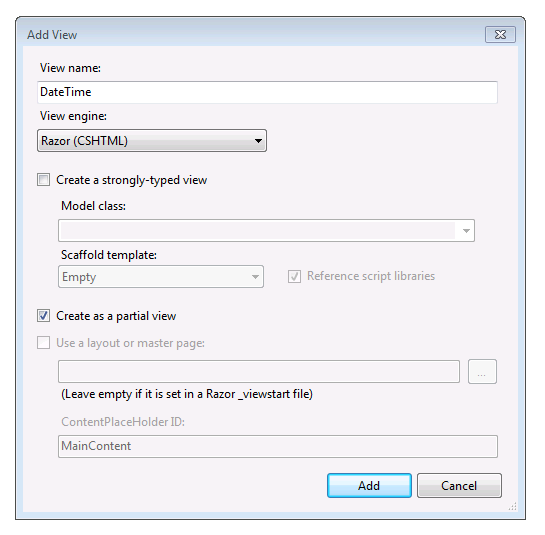
Click Add. A DateTime.cshtml template is created in the *Views.
The following image shows the Views folder in Solution Explorer after the DateTime display and editor templates are created.
Open the Views.cshtml file and add the following markup, which uses the String.Format method to format the property as a date without the time. (The {0:d} format specifies short date format.)
[!code-csharpMain]
1: @String.Format("{0:d}", Model.Date)
Repeat this step to create a DateTime template in the Viewsfolder. Use the following code in the Views.cshtml* file.
[!code-csharpMain]
1: <span class="loud-1">
2: @String.Format("{0:d}", Model.Date)
3: </span>
The loud-1 CSS class causes the date to be display in bold red text. You added the loud-1 CSS class just as a temporary measure so you can easily see when this particular template is being used.
What you’ve done is created and customized templates that ASP.NET will use to display dates. The more general template (in the Viewsfolder) displays a simple short date. The template that’s specifically for the Movie controller (in the Viewsfolder) displays a short date that’s also formatted as bold red text.
Press CTRL+F5 to run the application. The browser renders the Index view for the application.
The ReleaseDate property now displays the date in a bold red font without the time.This helps you confirm that the DateTime templated helper in the Viewsfolder is selected over the DateTime templated helper in the shared folder (Views).
Now rename the Views.cshtml file to Views.cshtml.
Press CTRL+F5 to run the application.
This time the ReleaseDate property displays a date without the time and without the bold red font. This illustrates that a template that has the name of the data type (in this case DateTime) is automatically used to display all model properties of that type. After you renamed the DateTime.cshtml file to LoudDateTime.cshtml, ASP.NET no longer found a template in the Viewsfolder, so it used the DateTime.cshtml* template from the *Views* folder.
(The template matching is case insensitive, so you could have created the template file name with any casing. For example, DATETIME.chstml, datetime.cshtml, and DaTeTiMe.cshtml would all match the DateTime type.)
To review: at this point, the ReleaseDate field is being displayed using the Views.cshtml template, which displays the data using a short date format, but otherwise adds no special format.
Using UIHint to Specify a Display Template
If your web application has many DateTime fields and by default you want to display all or most of them in date-only format, the DateTime.cshtml template is a good approach. But what if you have a few dates where you want to display the full date and time? No problem. You can create an additional template and use the UIHint attribute to specify formatting for the full date and time. You can then selectively apply that template. You can use the UIHint attribute at the model level or you can specify the template inside a view. In this section, you’ll see how to use the UIHint attribute to selectively change the formatting for some instances of date-time fields.
Open the Views.cshtml file and replace the existing code with the following:
[!code-cshtmlMain]
1: <span class="loud-2">
2: @Model.ToString()
3: </span>
This causes the full date and time to be displayed and adds the CSS class that makes the text green and large.
Open the Movie.cs file and add the UIHint attribute to the ReleaseDate property, as shown in the following example:
[!code-csharpMain]
1: [UIHint("LoudDateTime")]
2: public DateTime ReleaseDate { get; set; }
This tells ASP.NET MVC that when it displays the ReleaseDate property (specifically, and not just any DateTime object), it should use the LoudDateTime.cshtml template.
Press CTRL+F5 to run the application.
Notice that the ReleaseDate property now displays the date and time in a large green font.
Return to the UIHint attribute in the Movie.cs file and comment it out so the LoudDateTime.cshtml template won’t be used. Run the application again. The release date is not displayed large and green. This verifies that the Views.cshtml template is used in the Index and Details views.
As mentioned earlier, you can also apply a template in a view, which lets you apply the template to an individual instance of some data. Open the Views.cshtml view. Add "LoudDateTime" as the second parameter of the Html.DisplayFor call for the ReleaseDate field. The completed code looks like this:
[!code-cshtmlMain]
1: <div class="display-label">ReleaseDate</div>
2: <div class="display-field">
3: @Html.DisplayFor(model => model.ReleaseDate,"LoudDateTime")
4: </div>
This specifies that the LoudDateTime template should be used to display the model property, regardless of what attributes are applied to the model.
Press CTRL+F5 to run the application.
Verify that the movie index page is using the Views.cshtml template (red bold) and the Moviepage is using the Views.cshtml* template (large and green).
In the next section, you’ll create a template for a complex type.
 )
)
|
|