A Tour of ASP.NET Web Application Modeling
Rational XDE supports a controlled iterative process for developing ASP.NET Web applications. This process lets you create your application, analyze and refine it as you increase your understanding of its operation, and then generate the code-element object declarations of a complete ASP.NET Web application based on that model.
In this hands-on example, you model a Hello World Web application with server pages, client pages, ASP.NET server controls, and relationships using Rational XDE and the Microsoft Visual Studio .NET integrated development environment (IDE).
The Hello World Web application consists of two Web pages—a Login page on which a user can provide a user name and password, and a Welcome page that lets a user return to the Login page.
Process for Modeling a Hello World Web Application
-
Create a Rational XDE Web application project.
-
Add control elements to the Login page in the model.
-
Add model elements for the Welcome page.
-
Synchronize the model elements into the source code.
-
Position the controls in the Login page.
-
Add controls to the Welcome page.
-
Add code logic to the generated code structure.
-
Build and run the Hello World application.
Create a Rational XDE Web Application Project
Before you begin modeling your Hello World Web application, you must create a Rational XDE Web application project. You create an ASP.NET Web application project in the IDE and then synchronize it to create the Web application model. This tour uses Visual C# as the implementation language; XDE also supports Visual Basic for round-trip engineering of Web application projects.
To create a Rational XDE Web application project
-
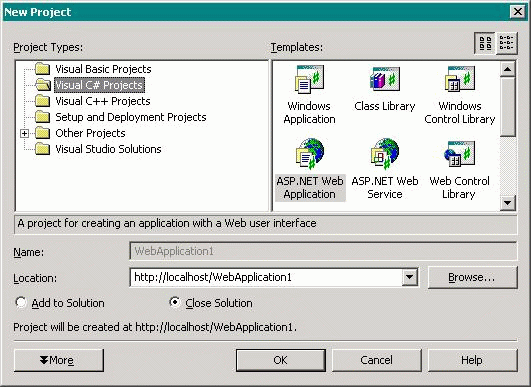
In Visual Studio .NET, click File > New > Project.
The New Project dialog box opens, as shown in the following figure:
-
In the Project Types pane, click Visual C# Projects.
-
In the Templates pane, click ASP.NET Web Application.
-
In the Location box, leave http://localhost/ as the URL, and replace the default project name WebApplication1 with HelloWorld.
-
Click OK.
Visual Studio creates a project for the Web application on the local Web server at the URL http://localhost/HelloWorld.
Visual Studio also creates the solution files for the Web application and stores them at the path specified in the Visual Studio projects location box on the Projects and Solutions page in the Options dialog box.
You use the WebForm1.aspx file and its code-behind file (WebForm1.aspx.cs) for the Login page.
-
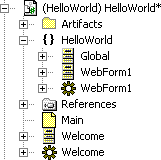
In Solution Explorer, click the HelloWorld project node, and then click Synchronize on the Solution Explorer toolbar.
Rational XDE creates the model elements in the Model Explorer, as shown in the following figure:
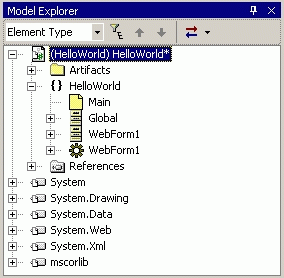
The System... model elements are the reference assembly models for the System... namespaces of the .NET Framework class library.
The selected model element in the figure is the root of the code model. The model elements that represent the code elements in the HelloWorld project are located under the HelloWorld namespace.
Add Control Elements to the Login Page in the Model
After you create the Rational XDE Web project, you can start adding design elements to your model. In this step of the process, you add the label, text box, button, and validation control elements for the Login page.
To add control elements to the Login page in the model
-
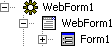
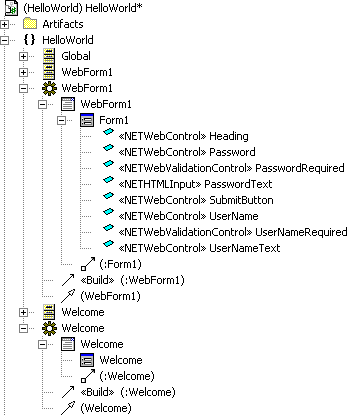
In the Model Explorer, expand the WebForm1 «ServerPage» stereotyped class, and then expand the WebForm1 «ClientPage» stereotyped class to expose the Form1 «HTMLForm» stereotyped class, as shown in the following figure:
-
Right-click the Form1 class, and then click Add Web > ASP.NET > Web Control on the shortcut menu.
-
Do the following in the Add Web Control dialog box:
-
In the Type list, click Label.
-
In the ID box, type Heading.
-
In the Value box, type Hello World - Login.
-
Click OK.
A «NETWebControl» stereotyped attribute named Heading is added to the «HTMLForm» class.
-
-
Repeat steps 2 and 3 to add the following four Web control elements to the HTML form:
Type
ID
Value
Label
UserName
User name:
TextBox
UserNameText
<leave blank>
Label
Password
Password:
Button
SubmitButton
Submit
-
Right-click the Form1 class, and then click Add Web > ASP.NET > HTML Server Input on the shortcut menu.
-
Enter the following values in the Add HTML Server Input dialog box:
Type
ID
Value
Name text
PasswordText
<leave blank>
Password Text A «NETHTMLInput» stereotyped element named PasswordText is added as an attribute of the «HTMLForm» class.
Note There is no technical requirement that the password text box be an HTML Server Input control element rather than a Web control element. The different control types are included in this tour to demonstrate that you can mix control types in the same HTML form.
-
Right-click the Form1 class, and then click Add Web > ASP.NET > Web Validation Control on the shortcut menu.
-
Enter the following values in the Add Web Validation Control dialog box:
Type
ID
Value
RequiredFieldValidator
UserNameRequired
User name is required
A «NETWebValidationControl» stereotyped element named UserNameRequired is added as an attribute of the «HTMLForm» class.
-
Repeat steps 8 and 9 to add the following Web validation control element to the HTML form:
Type
ID
Value
RequiredFieldValidator
PasswordRequired
Password is required
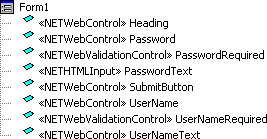
There are now eight control elements in the Model Explorer under the Form1 element, as shown in the following figure:
Add Model Elements for the Welcome Page
You are now ready to model the Welcome page that is displayed after a user logs in successfully. A Web page in the model consists of server page, client page, HTML form, and code-behind classes, and their relationships. All the necessary classes and relationships are present in the Server Page with Code-Behind Web pattern.
To add model elements for the Welcome page
-
If the Main diagram window is not open, double-click the Main diagram in the Model Explorer.
-
On the Web tab of the Toolbox, drag the Server Page with Code-Behind pattern to the diagram window.
-
In the Add Web Elements dialog box, type Welcome as the class name, and then click OK.
Rational XDE adds the set of classes and relationships in the Server Page with Code-Behind Web pattern to the diagram window and to the Model Explorer, as shown in the following figures. You can click the Arrange All Elements button on the Rational XDE Modeling toolbar to help you arrange the shapes visually.
In the diagram window:
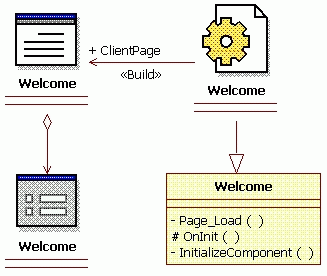
The un-stereotyped class is the code-behind class. It represents the class in the code-behind file that the .aspx file inherits.
In the Model Explorer:
A code-behind class, and the classes with which it is associated, must reside within the same namespace in a Web model.
Synchronize the Model Elements Into the Source Code
After you perform all the steps in the two preceding sections, the code model in the Model Explorer should appear similar to the following:
It's time to generate code for the elements you have added to the model.
To synchronize the model elements into the source code
-
In the Model Explorer, right-click the HelloWorld namespace, and then click Synchronize on the shortcut menu.
Visual Studio .NET displays message boxes informing you that the WebForm1.aspx file has changed outside of the source editor, and asking you if you want to reload the file.
-
Click Yes in each instance of the message box that is displayed.
Rational XDE creates the Welcome.aspx file and its Welcome.aspx.cs code-behind file. XDE also generates HTML code in the <form> element of the WebForm1.aspx file for the control elements that you added in the model.
Position the Controls on the Login Page
A control element in the model does not have properties that define its position on an HTML form. During code generation, Rational XDE uses default positioning for all the controls, stacking them in the upper left corner of the form. After generating code from the model, use the WebForms Designer to position the controls.
To position the controls on the Login page
-
In Solution Explorer, double-click the WebForm1.aspx file.
-
Click the Design tab of the WebForms Designer.
-
In Design view, move the Hello World - Login label to a position near the upper center of the form.
-
In the Properties window, set the value of the Font > Bold property to True and the Font > Name property to Verdana for the label.
-
In the WebForms Designer, move the remaining controls to arrange them in a manner similar to the following:
To distinguish the UserNameText and PasswordText text boxes, click one of the boxes in Design view, and then check the value of its identifier property [(ID) or (id)] in the Properties window.
Add Controls to the Welcome Page
You can add controls to a Web page in the IDE and then reverse engineer the files in which they appear to add their corresponding control elements to the model. You add two controls to the Welcome page—a label that serves as a heading, and a hyperlink that returns the user to the Login page.
To add controls to the Welcome page
-
In Solution Explorer, double-click the Welcome.aspx file to open it in the WebForms Designer.
-
Click the Design tab.
-
Do the following to add a label control to the page and assign property values:
-
On the Web Forms tab of the Toolbox, drag the Label tool to the upper center of the form.
-
In the Properties window, specify values for the following properties:
Property
Value
Font - Bold
True
Font - Name
Verdana
Text
Hello World - Welcome!
-
-
Do the following to add a hyperlink control to the page and assign property values:
-
On the Web Forms tab of the Toolbox, drag the Hyperlink tool to the center of the form below the label.
-
In the Properties window, specify values for the following properties:
Property
Value
Font - Name
Verdana
Text
Home
NavigateURL
WebForm1.aspx
-
-
To create model elements for the controls on the Welcome page, right-click the Welcome.aspx file in Solution Explorer, and then click Synchronize on the shortcut menu.
After synchronization is complete, you can review the Welcome model elements in the Model Explorer and diagram window in Rational XDE.
Add Code Logic to the Generated Code Structure
Now that all the controls are in place on the Web pages, you can add code that provides the functionality on the Login page.
You need to add event handling for the Submit button, as well as validation for the two input text boxes. Values are required in both boxes. The RequiredFieldValidator controls test for the presence of values in both fields.
To add code logic to the generated code structure
-
Click the WebForm1.aspx WebForms Designer tab to bring the file to the foreground, and then click the Design tab.
-
Double-click the Submit button to open the WebForm1.aspx.cs code-behind file.
-
Insert the following code inside the SubmitButton_Click method:
{Response.Redirect("Welcome.aspx");}Optionally, you can add additional code to validate the user name and password. For this tour, any
user name and password is accepted.
-
Associate each of the Web validation controls with its appropriate text box by doing the following:
-
In Design view, click the validation control.
-
In the Behavior category of the Properties window, click the value cell of the ControlToValidate property, and then click the name in the list that corresponds to the text box associated with the validation control.
-
Build and Run the Hello World Web Application
You've modeled the Web pages with their control elements and added programming logic in the source code. It's time to build and run your Web application.
To build and run the HelloWorld application
-
Click Build > Build HelloWorld.
-
Click Debug > Start Without Debugging.
-
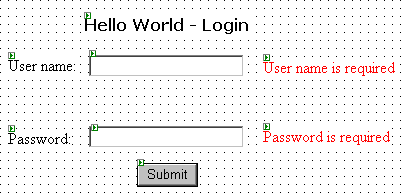
On the Login page, click Submit to test the validation controls.
Both required field error messages are displayed.
-
Type guest in both the User name and Password boxes, and then click Submit.
The Welcome page is displayed.
-
Click Home to return to the Login page.
 )
)
| <SITEMAP> <MVC> <ASP> <NET> <DATA> <KIOSK> <FLEX> <SQL> <NOTES> <LINUX> <MONO> <FREEWARE> <DOCS> <ENG> <CHAT ME> <ABOUT ME> < THANKS ME> |