Create a secure ASP.NET Web Forms app with user registration, email confirmation and password reset (C#)
by Erik Reitan
This tutorial shows you how to build an ASP.NET Web Forms app with user registration, email confirmation and password reset using the ASP.NET Identity membership system. This tutorial was based on Rick Anderson’s MVC tutorial.
Introduction
This tutorial guides you through the steps required to create an ASP.NET Web Forms application using Visual Studio and ASP.NET 4.5 to create a secure Web Forms app with user registration, email confirmation and password reset.
Tutorial Tasks and Information:
- Create an ASP.NET Web Forms app
- Hook Up SendGrid
- Require Email Confirmation Before Log In
- Password Recovery and Reset
- Resend Email Confirmation Link
- Troubleshooting the App
- Additional Resources
## Create an ASP.NET Web Forms App
Start by installing and running Visual Studio Express 2013 for Web or Visual Studio 2013. Install Visual Studio 2013 Update 3 or higher as well.
[!NOTE] Warning: You must install Visual Studio 2013 Update 3 or higher to complete this tutorial.
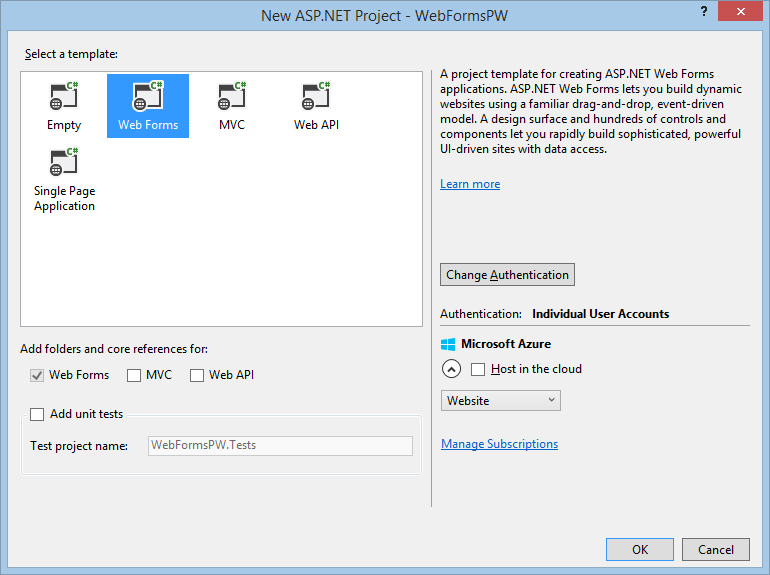
- Create a new project (File -> New Project) and select the ASP.NET Web Application template and the latest .NET Framework version from the New Project dialog box.
- From the New ASP.NET Project dialog box, select the Web Forms template. Leave the default authentication as Individual User Accounts. If you’d like to host the app in Azure, leave the Host in the cloud check box checked.
Then, click OK to create the new project.
- Enable Secure Sockets Layer (SSL) for the project. Follow the steps available in the Enable SSL for the Project section of the Getting Started with Web Forms tutorial series.
- Run the app, click the Register link and register a new user. At this point, the only validation on the email is based on the [EmailAddress] attribute to ensure the email address is well-formed. You will modify the code to add email confirmation. Close the browser window.
In Server Explorer of Visual Studio (View -> Server Explorer), navigate to **Data Connections*, right click and select Open table definition.
The following image shows the
AspNetUserstable schema: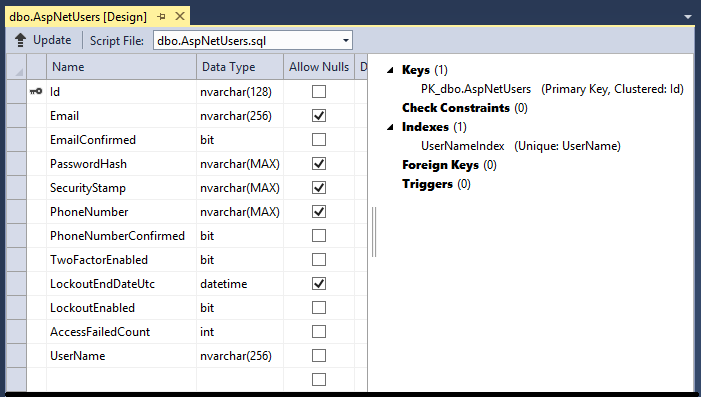
In Server Explorer, right-click on the AspNetUsers table and select Show Table Data.
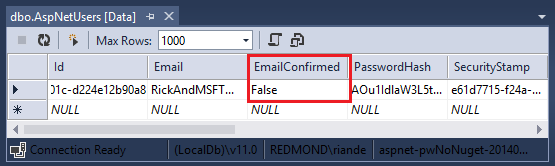
At this point the email for the registered user has not been confirmed.Click on the row and select delete to delete the user. You’ll add this email again in the next step and send a confirmation message to the email address.
Email Confirmation
It’s a best practice to confirm the email during the registration of a new user to verify they are not impersonating someone else (that is, they haven’t registered with someone else’s email). Suppose you had a discussion forum, you would want to prevent "bob@cpandl.com" from registering as "joe@contoso.com". Without email confirmation, "joe@contoso.com" could get unwanted email from your app. Suppose Bob accidently registered as "bib@cpandl.com" and hadn’t noticed it, he wouldn’t be able to use password recovery because the app doesn’t have his correct email. Email confirmation provides only limited protection from bots and doesn’t provide protection from determined spammers.
You generally want to prevent new users from posting any data to your website before they have been confirmed by either email, an SMS text message or another mechanism. In the sections below, we will enable email confirmation and modify the code to prevent newly registered users from logging in until their email has been confirmed. You’ll use the email service SendGrid in this tutorial.
Although this tutorial only shows how to add email notification through SendGrid, you can send email using SMTP and other mechanisms (see additional resources).
- In Visual Studio, open the Package Manager Console (Tools -> NuGet Package Manger -> Package Manager Console), and enter the following command:
Install-Package SendGrid - Go to the Azure SendGrid sign-up page and register for free SendGrid account. You can also sign-up for a free SendGrid account directly on SendGrid’s site.
From Solution Explorer open the IdentityConfig.cs file in the App_Start folder and add the following code highlighted in yellow to the
[!code-csharpMain]EmailServiceclass to configure SendGrid:1: public class EmailService : IIdentityMessageService
2: {3: public async Task SendAsync(IdentityMessage message)
4: {5: await configSendGridasync(message);6: }7:8: // Use NuGet to install SendGrid (Basic C# client lib)
9: private async Task configSendGridasync(IdentityMessage message)
10: {11: var myMessage = new SendGridMessage();
12: myMessage.AddTo(message.Destination);13: myMessage.From = new System.Net.Mail.MailAddress(
14: "Royce@contoso.com", "Royce Sellars (Contoso Admin)");
15: myMessage.Subject = message.Subject;16: myMessage.Text = message.Body;17: myMessage.Html = message.Body;18:19: var credentials = new NetworkCredential(
20: ConfigurationManager.AppSettings["emailServiceUserName"],
21: ConfigurationManager.AppSettings["emailServicePassword"]
22: );23:24: // Create a Web transport for sending email.
25: var transportWeb = new Web(credentials);
26:27: // Send the email.
28: if (transportWeb != null)
29: {30: await transportWeb.DeliverAsync(myMessage);31: }32: else
33: {34: Trace.TraceError("Failed to create Web transport.");
35: await Task.FromResult(0);36: }37: }38: }Also, add the following
[!code-csharpMain]usingstatements to the beginning of the IdentityConfig.cs file:1: using SendGrid;
2: using System.Net;
3: using System.Configuration;
4: using System.Diagnostics;
To keep this sample simple, you’ll store the email service account values in the
appSettingssection of the web.config file. Add the following XML highlighted in yellow to the web.config file at the root of your project:[!code-xmlMain]
1: </connectionStrings>
2: <appSettings>
3: <add key="emailServiceUserName" value="[EmailServiceAccountUserName]" />
4: <add key="emailServicePassword" value="[EmailServiceAccountPassword]" />
5: </appSettings>
6: <system.web>
[!WARNING] Security - Never store sensitive data in your source code. In this example, the account and credentials are stored in the appSetting section of the Web.config file. On Azure, you can securely store these values on the Configure tab in the Azure portal. For related information see Rick Anderson’s topic titled Best practices for deploying passwords and other sensitive data to ASP.NET and Azure.
Add the email service values to reflect your SendGrid authentication values (User Name and Password) so that you can successful send email from your app. Be sure to use your SendGrid account name rather than the email address you provided SendGrid.
Enable Email Confirmation
To enable email confirmation, you’ll modify the registration code using the following steps.
In the Account folder, open the Register.aspx.cs code-behind and update the
[!code-csharpMain]CreateUser_Clickmethod to enable the following highlighted changes:1: protected void CreateUser_Click(object sender, EventArgs e)
2: {3: var manager = Context.GetOwinContext().GetUserManager<ApplicationUserManager>();4: var user = new ApplicationUser() { UserName = Email.Text, Email = Email.Text };
5: IdentityResult result = manager.Create(user, Password.Text);6: if (result.Succeeded)
7: {8: // For more information on how to enable account confirmation and password reset please visit http://go.microsoft.com/fwlink/?LinkID=320771
9: string code = manager.GenerateEmailConfirmationToken(user.Id);
10: string callbackUrl = IdentityHelper.GetUserConfirmationRedirectUrl(code, user.Id, Request);
11: manager.SendEmail(user.Id, "Confirm your account", "Please confirm your account by clicking <a href=\"" + callbackUrl + "\">here</a>.");
12:13: IdentityHelper.SignIn(manager, user, isPersistent: false);
14: IdentityHelper.RedirectToReturnUrl(Request.QueryString["ReturnUrl"], Response);
15: }16: else
17: {18: ErrorMessage.Text = result.Errors.FirstOrDefault();19: }20: }- In Solution Explorer, right-click Default.aspx and select Set As Start Page.
- Run the app by pressing F5. After the page is displayed, click the Register link to display the Register page.
- Enter your email and password, then click the Register button to send an email message via SendGrid.
The current state of your project and code will allow the user to log in once they complete the registration form, even though they haven’t confirmed their account. Check your email account and click on the link to confirm your email.
Once you submit the registration form, you will be logged in.
## Require Email Confirmation Before Log In
Although you have confirmed the email account, at this point you would not need to click on the link contained in the verification email to be fully signed-in. In the following section, you will modify the code requiring new users to have a confirmed email before they are logged in (authenticated).
In Solution Explorer of Visual Studio, update the
[!code-csharpMain]CreateUser_Clickevent in the Register.aspx.cs code-behind contained in the Accounts folder with the following highlighted changes:1: protected void CreateUser_Click(object sender, EventArgs e)
2: {3: var manager = Context.GetOwinContext().GetUserManager<ApplicationUserManager>();4: var user = new ApplicationUser() { UserName = Email.Text, Email = Email.Text };
5: IdentityResult result = manager.Create(user, Password.Text);6: if (result.Succeeded)
7: {8: // For more information on how to enable account confirmation and password reset please visit http://go.microsoft.com/fwlink/?LinkID=320771
9: string code = manager.GenerateEmailConfirmationToken(user.Id);
10: string callbackUrl = IdentityHelper.GetUserConfirmationRedirectUrl(code, user.Id, Request);
11: manager.SendEmail(user.Id, "Confirm your account", "Please confirm your account by clicking <a href=\"" + callbackUrl + "\">here</a>.");
12:13: if (user.EmailConfirmed)
14: {15: IdentityHelper.SignIn(manager, user, isPersistent: false);
16: IdentityHelper.RedirectToReturnUrl(Request.QueryString["ReturnUrl"], Response);
17: }18: else
19: {20: ErrorMessage.Text = "An email has been sent to your account. Please view the email and confirm your account to complete the registration process.";
21: }22: }23: else
24: {25: ErrorMessage.Text = result.Errors.FirstOrDefault();26: }27: }Update the
LogInmethod in the Login.aspx.cs code-behind with the following highlighted changes:[!code-csharpMain]
1: protected void LogIn(object sender, EventArgs e)
2: {3: if (IsValid)
4: {5: // Validate the user password
6: var manager = Context.GetOwinContext().GetUserManager<ApplicationUserManager>();7: var signinManager = Context.GetOwinContext().GetUserManager<ApplicationSignInManager>();8:9: // Require the user to have a confirmed email before they can log on.
10: var user = manager.FindByName(Email.Text);11: if (user != null)
12: {13: if (!user.EmailConfirmed)
14: {15: FailureText.Text = "Invalid login attempt. You must have a confirmed email account.";
16: ErrorMessage.Visible = true;
17: }18: else
19: {20: // This doen't count login failures towards account lockout
21: // To enable password failures to trigger lockout, change to shouldLockout: true
22: var result = signinManager.PasswordSignIn(Email.Text, Password.Text, RememberMe.Checked, shouldLockout: false);
23:24: switch (result)
25: {26: case SignInStatus.Success:
27: IdentityHelper.RedirectToReturnUrl(Request.QueryString["ReturnUrl"], Response);
28: break;
29: case SignInStatus.LockedOut:
30: Response.Redirect("/Account/Lockout");
31: break;
32: case SignInStatus.RequiresVerification:
33: Response.Redirect(String.Format("/Account/TwoFactorAuthenticationSignIn?ReturnUrl={0}&RememberMe={1}",
34: Request.QueryString["ReturnUrl"],
35: RememberMe.Checked),36: true);
37: break;
38: case SignInStatus.Failure:
39: default:
40: FailureText.Text = "Invalid login attempt";
41: ErrorMessage.Visible = true;
42: break;
43: }44: }45: }46: }47: }
Run the Application
Now that you have implemented the code to check whether a user’s email address has been confirmed, you can check the functionality on both the Register and Login pages.
- Delete any accounts in the AspNetUsers table that contain the email alias you wish to test.
- Run the app (F5) and verify you cannot register as a user until you have confirmed your email address.
- Before confirming your new account via the email that was just sent, attempt to log in with the new account.
You’ll see that you are unable to log in and that you must have a confirmed email account. - Once you confirm your email address, log in to the app.
## Password Recovery and Reset
In Visual Studio, remove the comment characters from the
[!code-csharpMain]Forgotmethod in the Forgot.aspx.cs code-behind contained in the Account folder, so that the method appears as follows:1: protected void Forgot(object sender, EventArgs e)
2: {3: if (IsValid)
4: {5: // Validate the user's email address
6: var manager = Context.GetOwinContext().GetUserManager<ApplicationUserManager>();7: ApplicationUser user = manager.FindByName(Email.Text);8: if (user == null || !manager.IsEmailConfirmed(user.Id))
9: {10: FailureText.Text = "The user either does not exist or is not confirmed.";
11: ErrorMessage.Visible = true;
12: return;
13: }14: // For more information on how to enable account confirmation and password reset please visit http://go.microsoft.com/fwlink/?LinkID=320771
15: // Send email with the code and the redirect to reset password page
16: string code = manager.GeneratePasswordResetToken(user.Id);
17: string callbackUrl = IdentityHelper.GetResetPasswordRedirectUrl(code, Request);
18: manager.SendEmail(user.Id, "Reset Password", "Please reset your password by clicking <a href=\"" + callbackUrl + "\">here</a>.");
19: loginForm.Visible = false;
20: DisplayEmail.Visible = true;
21: }22: }Open the Login.aspx page. Replace the markup near the end of the loginForm section as highlighted below:
[!code-aspxMain]1: <%@ Page Title="Log in" Language="C#" MasterPageFile="~/Site.Master" AutoEventWireup="true" CodeBehind="Login.aspx.cs" Inherits="WebForms002.Account.Login" Async="true" %>
2:3: <%@ Register Src="~/Account/OpenAuthProviders.ascx" TagPrefix="uc" TagName="OpenAuthProviders" %>
4:5: <asp:Content runat="server" ID="BodyContent" ContentPlaceHolderID="MainContent">
6: <h2><%: Title %>.</h2>
7:8: <div class="row">
9: <div class="col-md-8">
10: <section id="loginForm">
11: <div class="form-horizontal">
12: <h4>Use a local account to log in.</h4>
13: <hr />
14: <asp:PlaceHolder runat="server" ID="ErrorMessage" Visible="false">
15: <p class="text-danger">
16: <asp:Literal runat="server" ID="FailureText" />
17: </p>
18: </asp:PlaceHolder>
19: <div class="form-group">
20: <asp:Label runat="server" AssociatedControlID="Email" CssClass="col-md-2 control-label">Email</asp:Label>
21: <div class="col-md-10">
22: <asp:TextBox runat="server" ID="Email" CssClass="form-control" TextMode="Email" />
23: <asp:RequiredFieldValidator runat="server" ControlToValidate="Email"
24: CssClass="text-danger" ErrorMessage="The email field is required." />
25: </div>
26: </div>
27: <div class="form-group">
28: <asp:Label runat="server" AssociatedControlID="Password" CssClass="col-md-2 control-label">Password</asp:Label>
29: <div class="col-md-10">
30: <asp:TextBox runat="server" ID="Password" TextMode="Password" CssClass="form-control" />
31: <asp:RequiredFieldValidator runat="server" ControlToValidate="Password" CssClass="text-danger" ErrorMessage="The password field is required." />
32: </div>
33: </div>
34: <div class="form-group">
35: <div class="col-md-offset-2 col-md-10">
36: <div class="checkbox">
37: <asp:CheckBox runat="server" ID="RememberMe" />
38: <asp:Label runat="server" AssociatedControlID="RememberMe">Remember me?</asp:Label>
39: </div>
40: </div>
41: </div>
42: <div class="form-group">
43: <div class="col-md-offset-2 col-md-10">
44: <asp:Button runat="server" OnClick="LogIn" Text="Log in" CssClass="btn btn-default" />
45: </div>
46: </div>
47: </div>
48: <p>
49: <asp:HyperLink runat="server" ID="RegisterHyperLink" ViewStateMode="Disabled">Register as a new user</asp:HyperLink>
50: </p>
51: <p>
52: <%-- Enable this once you have account confirmation enabled for password reset functionality --%>
53: <asp:HyperLink runat="server" ID="ForgotPasswordHyperLink" ViewStateMode="Disabled">Forgot your password?</asp:HyperLink>
54: </p>
55: </section>
56: </div>
57:58: <div class="col-md-4">
59: <section id="socialLoginForm">
60: <uc:OpenAuthProviders runat="server" ID="OpenAuthLogin" />
61: </section>
62: </div>
63: </div>
64: </asp:Content>
Open the Login.aspx.cs code-behind and uncomment the following line of code highlighted in yellow from the
[!code-csharpMain]Page_Loadevent handler:1: protected void Page_Load(object sender, EventArgs e)
2: {3: RegisterHyperLink.NavigateUrl = "Register";
4: // Enable this once you have account confirmation enabled for password reset functionality
5: ForgotPasswordHyperLink.NavigateUrl = "Forgot";
6: OpenAuthLogin.ReturnUrl = Request.QueryString["ReturnUrl"];
7: var returnUrl = HttpUtility.UrlEncode(Request.QueryString["ReturnUrl"]);
8: if (!String.IsNullOrEmpty(returnUrl))
9: {10: RegisterHyperLink.NavigateUrl += "?ReturnUrl=" + returnUrl;
11: }12: }- Run the app by pressing F5. After the page is displayed, click the Log in link.
- Click the Forgot your password? link to display the Forgot Password page.
- Enter your email address and click the Submit button to send an email to your address which will allow you to reset your password.
Check your email account and click on the link to display the Reset Password page. On the Reset Password page, enter your email, password, and confirmed password. Then, press the Reset button.
When you successfully reset your password, the Password Changed page will be displayed. Now you can log in with your new password.
## Resend Email Confirmation Link
Once a user creates a new local account, they are emailed a confirmation link they are required to use before they can log on. If the user accidently deletes the confirmation email, or the email never arrives, they will need the confirmation link sent again. The following code changes show how to enable this.
In Visual Studio, open the Login.aspx.cs code-behind and add the following event handler after the
[!code-csharpMain]LogInevent handler:1: protected void SendEmailConfirmationToken(object sender, EventArgs e)
2: {3: var manager = Context.GetOwinContext().GetUserManager<ApplicationUserManager>();4: var user = manager.FindByName(Email.Text);5: if (user != null)
6: {7: if (!user.EmailConfirmed)
8: {9: string code = manager.GenerateEmailConfirmationToken(user.Id);
10: string callbackUrl = IdentityHelper.GetUserConfirmationRedirectUrl(code, user.Id, Request);
11: manager.SendEmail(user.Id, "Confirm your account", "Please confirm your account by clicking <a href=\"" + callbackUrl + "\">here</a>.");
12:13: FailureText.Text = "Confirmation email sent. Please view the email and confirm your account.";
14: ErrorMessage.Visible = true;
15: ResendConfirm.Visible = false;
16: }17: }18: }Modify the
[!code-csharpMain]LogInevent handler in the Login.aspx.cs code-behind by changing the code highlighted in yellow as follows:1: protected void LogIn(object sender, EventArgs e)
2: {3: if (IsValid)
4: {5: // Validate the user password
6: var manager = Context.GetOwinContext().GetUserManager<ApplicationUserManager>();7: var signinManager = Context.GetOwinContext().GetUserManager<ApplicationSignInManager>();8:9: // Require the user to have a confirmed email before they can log on.
10: var user = manager.FindByName(Email.Text);11: if (user != null)
12: {13: if (!user.EmailConfirmed)
14: {15: FailureText.Text = "Invalid login attempt. You must have a confirmed email address. Enter your email and password, then press 'Resend Confirmation'.";
16: ErrorMessage.Visible = true;
17: ResendConfirm.Visible = true;
18: }19: else
20: {21: // This doen't count login failures towards account lockout
22: // To enable password failures to trigger lockout, change to shouldLockout: true
23: var result = signinManager.PasswordSignIn(Email.Text, Password.Text, RememberMe.Checked, shouldLockout: false);
24:25: switch (result)
26: {27: case SignInStatus.Success:
28: IdentityHelper.RedirectToReturnUrl(Request.QueryString["ReturnUrl"], Response);
29: break;
30: case SignInStatus.LockedOut:
31: Response.Redirect("/Account/Lockout");
32: break;
33: case SignInStatus.RequiresVerification:
34: Response.Redirect(String.Format("/Account/TwoFactorAuthenticationSignIn?ReturnUrl={0}&RememberMe={1}",
35: Request.QueryString["ReturnUrl"],
36: RememberMe.Checked),37: true);
38: break;
39: case SignInStatus.Failure:
40: default:
41: FailureText.Text = "Invalid login attempt";
42: ErrorMessage.Visible = true;
43: break;
44: }45: }46: }47: }48: }Update the Login.aspx page by adding the code highlighted in yellow as follows:
[!code-aspxMain]1: <%@ Page Title="Log in" Language="C#" MasterPageFile="~/Site.Master" AutoEventWireup="true" CodeBehind="Login.aspx.cs" Inherits="WebForms002.Account.Login" Async="true" %>
2:3: <%@ Register Src="~/Account/OpenAuthProviders.ascx" TagPrefix="uc" TagName="OpenAuthProviders" %>
4:5: <asp:Content runat="server" ID="BodyContent" ContentPlaceHolderID="MainContent">
6: <h2><%: Title %>.</h2>
7:8: <div class="row">
9: <div class="col-md-8">
10: <section id="loginForm">
11: <div class="form-horizontal">
12: <h4>Use a local account to log in.</h4>
13: <hr />
14: <asp:PlaceHolder runat="server" ID="ErrorMessage" Visible="false">
15: <p class="text-danger">
16: <asp:Literal runat="server" ID="FailureText" />
17: </p>
18: </asp:PlaceHolder>
19: <div class="form-group">
20: <asp:Label runat="server" AssociatedControlID="Email" CssClass="col-md-2 control-label">Email</asp:Label>
21: <div class="col-md-10">
22: <asp:TextBox runat="server" ID="Email" CssClass="form-control" TextMode="Email" />
23: <asp:RequiredFieldValidator runat="server" ControlToValidate="Email"
24: CssClass="text-danger" ErrorMessage="The email field is required." />
25: </div>
26: </div>
27: <div class="form-group">
28: <asp:Label runat="server" AssociatedControlID="Password" CssClass="col-md-2 control-label">Password</asp:Label>
29: <div class="col-md-10">
30: <asp:TextBox runat="server" ID="Password" TextMode="Password" CssClass="form-control" />
31: <asp:RequiredFieldValidator runat="server" ControlToValidate="Password" CssClass="text-danger" ErrorMessage="The password field is required." />
32: </div>
33: </div>
34: <div class="form-group">
35: <div class="col-md-offset-2 col-md-10">
36: <div class="checkbox">
37: <asp:CheckBox runat="server" ID="RememberMe" />
38: <asp:Label runat="server" AssociatedControlID="RememberMe">Remember me?</asp:Label>
39: </div>
40: </div>
41: </div>
42: <div class="form-group">
43: <div class="col-md-offset-2 col-md-10">
44: <asp:Button runat="server" OnClick="LogIn" Text="Log in" CssClass="btn btn-default" />
45:
46: <asp:Button runat="server" ID="ResendConfirm" OnClick="SendEmailConfirmationToken" Text="Resend confirmation" Visible="false" CssClass="btn btn-default" />
47: </div>
48: </div>
49: </div>
50: <p>
51: <asp:HyperLink runat="server" ID="RegisterHyperLink" ViewStateMode="Disabled">Register as a new user</asp:HyperLink>
52: </p>
53: <p>
54: <%-- Enable this once you have account confirmation enabled for password reset functionality --%>
55: <asp:HyperLink runat="server" ID="ForgotPasswordHyperLink" ViewStateMode="Disabled">Forgot your password?</asp:HyperLink>
56: </p>
57: </section>
58: </div>
59:60: <div class="col-md-4">
61: <section id="socialLoginForm">
62: <uc:OpenAuthProviders runat="server" ID="OpenAuthLogin" />
63: </section>
64: </div>
65: </div>
66: </asp:Content>
- Delete any accounts in the AspNetUsers table that contain the email alias you wish to test.
- Run the app (F5) and register your email address.
- Before confirming your new account via the email that was just sent, attempt to log in with the new account.
You’ll see that you are unable to log in and that you must have a confirmed email account. In addition, you can now resend a confirmation message to your email account. - Enter your email address and password, then press the Resend confirmation button.
Once you confirm your email address based on the newly sent email message, log in to the app.
If you don’t receive an email containing the link to verify your credentials:
- Check your junk or spam folder.
- Log into your SendGrid account and click on the Email Activity link.
- Be certain you used your SendGrid user account name as a Web.config value rather than your SendGrid account email address.
- Links to ASP.NET Identity Recommended Resources
- Account Confirmation and Password Recovery with ASP.NET Identity
- ASP.NET Web Forms tutorial series - Add an OAuth 2.0 Provider
- Deploy a Secure ASP.NET Web Forms App with Membership, OAuth, and SQL Database to Azure App Service
- ASP.NET Web Forms tutorial series - Enable SSL for the Project
 )
)
|
|