Handling Concurrency with the Entity Framework 4.0 in an ASP.NET 4 Web Application
by Tom Dykstra
This tutorial series builds on the Contoso University web application that is created by the Getting Started with the Entity Framework 4.0 tutorial series. If you didn’t complete the earlier tutorials, as a starting point for this tutorial you can download the application that you would have created. You can also download the application that is created by the complete tutorial series. If you have questions about the tutorials, you can post them to the ASP.NET Entity Framework forum.
In the previous tutorial you learned how to sort and filter data using the ObjectDataSource control and the Entity Framework. This tutorial shows options for handling concurrency in an ASP.NET web application that uses the Entity Framework. You will create a new web page that’s dedicated to updating instructor office assignments. You’ll handle concurrency issues in that page and in the Departments page that you created earlier.

Concurrency Conflicts
A concurrency conflict occurs when one user edits a record and another user edits the same record before the first user’s change is written to the database. If you don’t set up the Entity Framework to detect such conflicts, whoever updates the database last overwrites the other user’s changes. In many applications, this risk is acceptable, and you don’t have to configure the application to handle possible concurrency conflicts. (If there are few users, or few updates, or if isn’t really critical if some changes are overwritten, the cost of programming for concurrency might outweigh the benefit.) If you don’t need to worry about concurrency conflicts, you can skip this tutorial; the remaining two tutorials in the series don’t depend on anything you build in this one.
Pessimistic Concurrency (Locking)
If your application does need to prevent accidental data loss in concurrency scenarios, one way to do that is to use database locks. This is called pessimistic concurrency. For example, before you read a row from a database, you request a lock for read-only or for update access. If you lock a row for update access, no other users are allowed to lock the row either for read-only or update access, because they would get a copy of data that’s in the process of being changed. If you lock a row for read-only access, others can also lock it for read-only access but not for update.
Managing locks has some disadvantages. It can be complex to program. It requires significant database management resources, and it can cause performance problems as the number of users of an application increases (that is, it doesn’t scale well). For these reasons, not all database management systems support pessimistic concurrency. The Entity Framework provides no built-in support for it, and this tutorial doesn’t show you how to implement it.
Optimistic Concurrency
The alternative to pessimistic concurrency is optimistic concurrency. Optimistic concurrency means allowing concurrency conflicts to happen, and then reacting appropriately if they do. For example, John runs the Department.aspx page, clicks the Edit link for the History department, and reduces the Budget amount from $1,000,000.00 to $125,000.00. (John administers a competing department and wants to free up money for his own department.)

Before John clicks Update, Jane runs the same page, clicks the Edit link for the History department, and then changes the Start Date field from 1/10/2011 to 1/1/1999. (Jane administers the History department and wants to give it more seniority.)
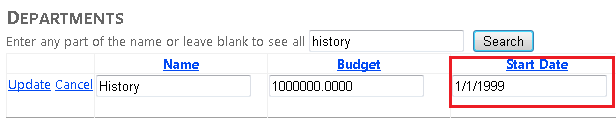
John clicks Update first, then Jane clicks Update. Jane’s browser now lists the Budget amount as $1,000,000.00, but this is incorrect because the amount has been changed by John to $125,000.00.
Some of the actions you can take in this scenario include the following:
You can keep track of which property a user has modified and update only the corresponding columns in the database. In the example scenario, no data would be lost, because different properties were updated by the two users. The next time someone browses the History department, they will see 1/1/1999 and $125,000.00.
This is the default behavior in the Entity Framework, and it can substantially reduce the number of conflicts that could result in data loss. However, this behavior doesn’t avoid data loss if competing changes are made to the same property of an entity. In addition, this behavior isn’t always possible; when you map stored procedures to an entity type, all of an entity’s properties are updated when any changes to the entity are made in the database.- You can let Jane’s change overwrite John’s change. After Jane clicks Update, the Budget amount goes back to $1,000,000.00. This is called a Client Wins or Last in Wins scenario. (The client’s values take precedence over what’s in the data store.)
You can prevent Jane’s change from being updated in the database. Typically, you would display an error message, show her the current state of the data, and allow her to reenter her changes if she still wants to make them. You could further automate the process by saving her input and giving her an opportunity to reapply it without having to reenter it. This is called a Store Wins scenario. (The data-store values take precedence over the values submitted by the client.)
Detecting Concurrency Conflicts
In the Entity Framework, you can resolve conflicts by handling OptimisticConcurrencyException exceptions that the Entity Framework throws. In order to know when to throw these exceptions, the Entity Framework must be able to detect conflicts. Therefore, you must configure the database and the data model appropriately. Some options for enabling conflict detection include the following:
In the database, include a table column that can be used to determine when a row has been changed. You can then configure the Entity Framework to include that column in the
Whereclause of SQLUpdateorDeletecommands.That’s the purpose of the
Timestampcolumn in theOfficeAssignmenttable.
The data type of the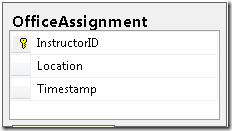
Timestampcolumn is also calledTimestamp. However, the column doesn’t actually contain a date or time value. Instead, the value is a sequential number that’s incremented each time the row is updated. In anUpdateorDeletecommand, theWhereclause includes the originalTimestampvalue. If the row being updated has been changed by another user, the value inTimestampis different than the original value, so theWhereclause returns no row to update. When the Entity Framework finds that no rows have been updated by the currentUpdateorDeletecommand (that is, when the number of affected rows is zero), it interprets that as a concurrency conflict.Configure the Entity Framework to include the original values of every column in the table in the
Whereclause ofUpdateandDeletecommands.As in the first option, if anything in the row has changed since the row was first read, the
Whereclause won’t return a row to update, which the Entity Framework interprets as a concurrency conflict. This method is as effective as using aTimestampfield, but can be inefficient. For database tables that have many columns, it can result in very largeWhereclauses, and in a web application it can require that you maintain large amounts of state. Maintaining large amounts of state can affect application performance because it either requires server resources (for example, session state) or must be included in the web page itself (for example, view state).
In this tutorial you will add error handling for optimistic concurrency conflicts for an entity that doesn’t have a tracking property (the Department entity) and for an entity that does have a tracking property (the OfficeAssignment entity).
Handling Optimistic Concurrency Without a Tracking Property
To implement optimistic concurrency for the Department entity, which doesn’t have a tracking (Timestamp) property, you will complete the following tasks:
- Change the data model to enable concurrency tracking for
Departmententities. - In the
SchoolRepositoryclass, handle concurrency exceptions in theSaveChangesmethod. - In the Departments.aspx page, handle concurrency exceptions by displaying a message to the user warning that the attempted changes were unsuccessful. The user can then see the current values and retry the changes if they are still needed.
Enabling Concurrency Tracking in the Data Model
In Visual Studio, open the Contoso University web application that you were working with in the previous tutorial in this series.
Open SchoolModel.edmx, and in the data model designer, right-click the Name property in the Department entity and then click Properties. In the Properties window, change the ConcurrencyMode property to Fixed.
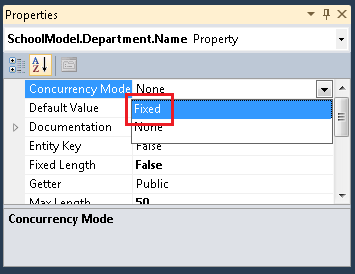
Do the same for the other non-primary-key scalar properties (Budget, StartDate, and Administrator.) (You can’t do this for navigation properties.) This specifies that whenever the Entity Framework generates a Update or Delete SQL command to update the Department entity in the database, these columns (with original values) must be included in the Where clause. If no row is found when the Update or Delete command executes, the Entity Framework will throw an optimistic-concurrency exception.
Save and close the data model.
Handling Concurrency Exceptions in the DAL
Open SchoolRepository.cs and add the following using statement for the System.Data namespace:
[!code-csharpMain]
1: using System.Data;
Add the following new SaveChanges method, which handles optimistic concurrency exceptions:
[!code-csharpMain]
1: public void SaveChanges()
2: {
3: try
4: {
5: context.SaveChanges();
6: }
7: catch (OptimisticConcurrencyException ocex)
8: {
9: context.Refresh(RefreshMode.StoreWins, ocex.StateEntries[0].Entity);
10: throw ocex;
11: }
12: }
If a concurrency error occurs when this method is called, the property values of the entity in memory are replaced with the values currently in the database. The concurrency exception is rethrown so that the web page can handle it.
In the DeleteDepartment and UpdateDepartment methods, replace the existing call to context.SaveChanges() with a call to SaveChanges() in order to invoke the new method.
Handling Concurrency Exceptions in the Presentation Layer
Open Departments.aspx and add an OnDeleted="DepartmentsObjectDataSource_Deleted" attribute to the DepartmentsObjectDataSource control. The opening tag for the control will now resemble the following example.
[!code-aspxMain]
1: <asp:ObjectDataSource ID="DepartmentsObjectDataSource" runat="server"
2: TypeName="ContosoUniversity.BLL.SchoolBL" DataObjectTypeName="ContosoUniversity.DAL.Department"
3: SelectMethod="GetDepartmentsByName" DeleteMethod="DeleteDepartment" UpdateMethod="UpdateDepartment"
4: ConflictDetection="CompareAllValues" OldValuesParameterFormatString="orig{0}"
5: OnUpdated="DepartmentsObjectDataSource_Updated" SortParameterName="sortExpression"
6: OnDeleted="DepartmentsObjectDataSource_Deleted" >
In the DepartmentsGridView control, specify all of the table columns in the DataKeyNames attribute, as shown in the following example. Note that this will create very large view state fields, which is one reason why using a tracking field is generally the preferred way to track concurrency conflicts.
[!code-aspxMain]
1: <asp:GridView ID="DepartmentsGridView" runat="server" AutoGenerateColumns="False"
2: DataSourceID="DepartmentsObjectDataSource"
3: DataKeyNames="DepartmentID,Name,Budget,StartDate,Administrator"
4: OnRowUpdating="DepartmentsGridView_RowUpdating"
5: OnRowDataBound="DepartmentsGridView_RowDataBound"
6: AllowSorting="True" >
Open Departments.aspx.cs and add the following using statement for the System.Data namespace:
[!code-csharpMain]
1: using System.Data;
Add the following new method, which you will call from the data source control’s Updated and Deleted event handlers for handling concurrency exceptions:
[!code-csharpMain]
1: private void CheckForOptimisticConcurrencyException(ObjectDataSourceStatusEventArgs e, string function)
2: {
3: if (e.Exception.InnerException is OptimisticConcurrencyException)
4: {
5: var concurrencyExceptionValidator = new CustomValidator();
6: concurrencyExceptionValidator.IsValid = false;
7: concurrencyExceptionValidator.ErrorMessage =
8: "The record you attempted to edit or delete was modified by another " +
9: "user after you got the original value. The edit or delete operation was canceled " +
10: "and the other user's values have been displayed so you can " +
11: "determine whether you still want to edit or delete this record.";
12: Page.Validators.Add(concurrencyExceptionValidator);
13: e.ExceptionHandled = true;
14: }
15: }
This code checks the exception type, and if it’s a concurrency exception, the code dynamically creates a CustomValidator control that in turn displays a message in the ValidationSummary control.
Call the new method from the Updated event handler that you added earlier. In addition, create a new Deleted event handler that calls the same method (but doesn’t do anything else):
[!code-csharpMain]
1: protected void DepartmentsObjectDataSource_Updated(object sender, ObjectDataSourceStatusEventArgs e)
2: {
3: if (e.Exception != null)
4: {
5: CheckForOptimisticConcurrencyException(e, "update");
6: // ...
7: }
8: }
9:
10: protected void DepartmentsObjectDataSource_Deleted(object sender, ObjectDataSourceStatusEventArgs e)
11: {
12: if (e.Exception != null)
13: {
14: CheckForOptimisticConcurrencyException(e, "delete");
15: }
16: }
Testing Optimistic Concurrency in the Departments Page
Run the Departments.aspx page.
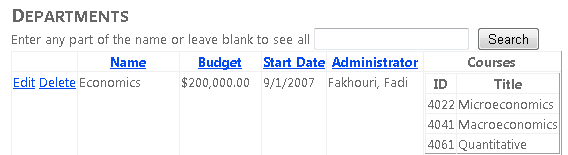
Click Edit in a row and change the value in the Budget column. (Remember that you can only edit records that you’ve created for this tutorial, because the existing School database records contain some invalid data. The record for the Economics department is a safe one to experiment with.)

Open a new browser window and run the page again (copy the URL from the first browser window’s address box to the second browser window).

Click Edit in the same row you edited earlier and change the Budget value to something different.

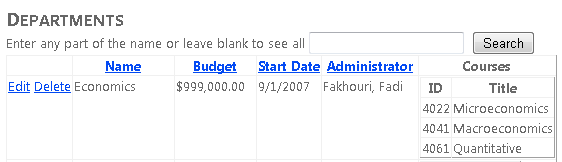
In the second browser window, click Update. The Budget amount is successfully changed to this new value.
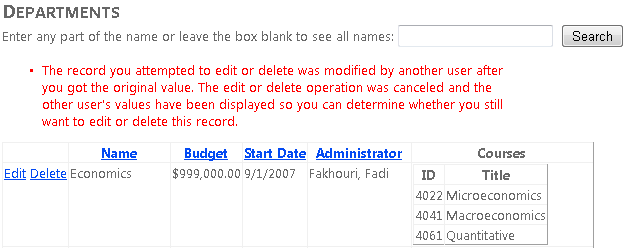
In the first browser window, click Update. The update fails. The Budget amount is redisplayed using the value you set in the second browser window, and you see an error message.
Handling Optimistic Concurrency Using a Tracking Property
To handle optimistic concurrency for an entity that has a tracking property, you will complete the following tasks:
- Add stored procedures to the data model to manage
OfficeAssignmententities. (Tracking properties and stored procedures don’t have to be used together; they’re just grouped together here for illustration.) - Add CRUD methods to the DAL and the BLL for
OfficeAssignmententities, including code to handle optimistic concurrency exceptions in the DAL. - Create an office-assignments web page.
- Test optimistic concurrency in the new web page.
Adding OfficeAssignment Stored Procedures to the Data Model
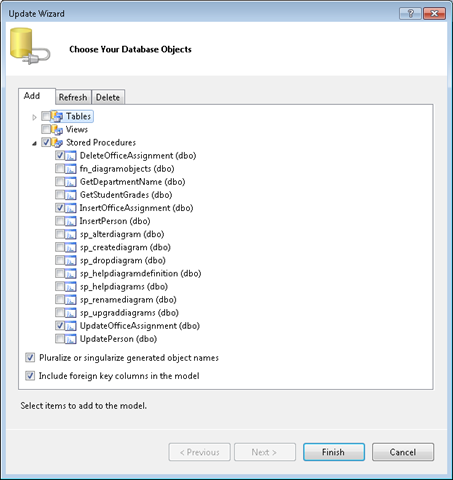
Open the SchoolModel.edmx file in the model designer, right-click the design surface, and click Update Model from Database. In the Add tab of the Choose Your Database Objects dialog box, expand Stored Procedures and select the three OfficeAssignment stored procedures (see the following screenshot), and then click Finish. (These stored procedures were already in the database when you downloaded or created it using a script.)
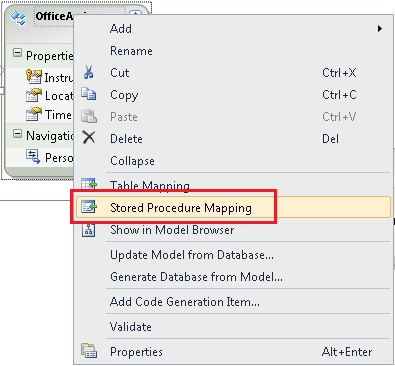
Right-click the OfficeAssignment entity and select Stored Procedure Mapping.
Set the Insert, Update, and Delete functions to use their corresponding stored procedures. For the OrigTimestamp parameter of the Update function, set the Property to Timestamp and select the Use Original Value option.
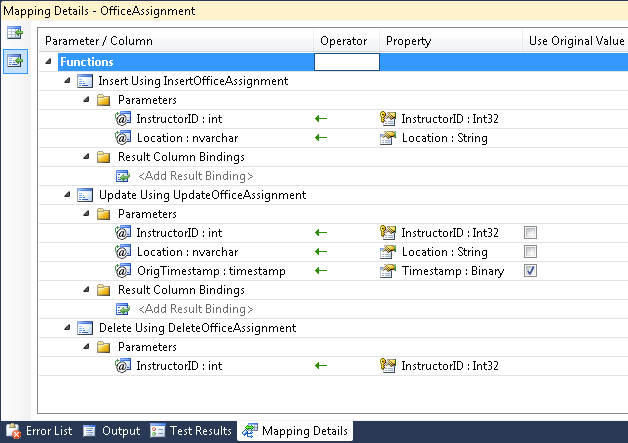
When the Entity Framework calls the UpdateOfficeAssignment stored procedure, it will pass the original value of the Timestamp column in the OrigTimestamp parameter. The stored procedure uses this parameter in its Where clause:
[!code-sqlMain]
1: ALTER PROCEDURE [dbo].[UpdateOfficeAssignment]
2: @InstructorID int,
3: @Location nvarchar(50),
4: @OrigTimestamp timestamp
5: AS
6: UPDATE OfficeAssignment SET Location=@Location
7: WHERE InstructorID=@InstructorID AND [Timestamp]=@OrigTimestamp;
8: IF @@ROWCOUNT > 0
9: BEGIN
10: SELECT [Timestamp] FROM OfficeAssignment
11: WHERE InstructorID=@InstructorID;
12: END
The stored procedure also selects the new value of the Timestamp column after the update so that the Entity Framework can keep the OfficeAssignment entity that’s in memory in sync with the corresponding database row.
(Note that the stored procedure for deleting an office assignment doesn’t have an OrigTimestamp parameter. Because of this, the Entity Framework can’t verify that an entity is unchanged before deleting it.)
Save and close the data model.
Adding OfficeAssignment Methods to the DAL
Open ISchoolRepository.cs and add the following CRUD methods for the OfficeAssignment entity set:
[!code-csharpMain]
1: IEnumerable<OfficeAssignment> GetOfficeAssignments(string sortExpression);
2: void InsertOfficeAssignment(OfficeAssignment OfficeAssignment);
3: void DeleteOfficeAssignment(OfficeAssignment OfficeAssignment);
4: void UpdateOfficeAssignment(OfficeAssignment OfficeAssignment, OfficeAssignment origOfficeAssignment);
Add the following new methods to SchoolRepository.cs. In the UpdateOfficeAssignment method, you call the local SaveChanges method instead of context.SaveChanges.
[!code-csharpMain]
1: public IEnumerable<OfficeAssignment> GetOfficeAssignments(string sortExpression)
2: {
3: return new ObjectQuery<OfficeAssignment>("SELECT VALUE o FROM OfficeAssignments AS o", context).Include("Person").OrderBy("it." + sortExpression).ToList();
4: }
5:
6: public void InsertOfficeAssignment(OfficeAssignment officeAssignment)
7: {
8: context.OfficeAssignments.AddObject(officeAssignment);
9: context.SaveChanges();
10: }
11:
12: public void DeleteOfficeAssignment(OfficeAssignment officeAssignment)
13: {
14: context.OfficeAssignments.Attach(officeAssignment);
15: context.OfficeAssignments.DeleteObject(officeAssignment);
16: context.SaveChanges();
17: }
18:
19: public void UpdateOfficeAssignment(OfficeAssignment officeAssignment, OfficeAssignment origOfficeAssignment)
20: {
21: context.OfficeAssignments.Attach(origOfficeAssignment);
22: context.ApplyCurrentValues("OfficeAssignments", officeAssignment);
23: SaveChanges();
24: }
In the test project, open MockSchoolRepository.cs and add the following OfficeAssignment collection and CRUD methods to it. (The mock repository must implement the repository interface, or the solution won’t compile.)
[!code-csharpMain]
1: List<OfficeAssignment> officeAssignments = new List<OfficeAssignment>();
2:
3: public IEnumerable<OfficeAssignment> GetOfficeAssignments(string sortExpression)
4: {
5: return officeAssignments;
6: }
7:
8: public void InsertOfficeAssignment(OfficeAssignment officeAssignment)
9: {
10: officeAssignments.Add(officeAssignment);
11: }
12:
13: public void DeleteOfficeAssignment(OfficeAssignment officeAssignment)
14: {
15: officeAssignments.Remove(officeAssignment);
16: }
17:
18: public void UpdateOfficeAssignment(OfficeAssignment officeAssignment, OfficeAssignment origOfficeAssignment)
19: {
20: officeAssignments.Remove(origOfficeAssignment);
21: officeAssignments.Add(officeAssignment);
22: }
Adding OfficeAssignment Methods to the BLL
In the main project, open SchoolBL.cs and add the following CRUD methods for the OfficeAssignment entity set to it:
[!code-csharpMain]
1: public IEnumerable<OfficeAssignment> GetOfficeAssignments(string sortExpression)
2: {
3: if (string.IsNullOrEmpty(sortExpression)) sortExpression = "Person.LastName";
4: return schoolRepository.GetOfficeAssignments(sortExpression);
5: }
6:
7: public void InsertOfficeAssignment(OfficeAssignment officeAssignment)
8: {
9: try
10: {
11: schoolRepository.InsertOfficeAssignment(officeAssignment);
12: }
13: catch (Exception ex)
14: {
15: //Include catch blocks for specific exceptions first,
16: //and handle or log the error as appropriate in each.
17: //Include a generic catch block like this one last.
18: throw ex;
19: }
20: }
21:
22: public void DeleteOfficeAssignment(OfficeAssignment officeAssignment)
23: {
24: try
25: {
26: schoolRepository.DeleteOfficeAssignment(officeAssignment);
27: }
28: catch (Exception ex)
29: {
30: //Include catch blocks for specific exceptions first,
31: //and handle or log the error as appropriate in each.
32: //Include a generic catch block like this one last.
33: throw ex;
34: }
35: }
36:
37: public void UpdateOfficeAssignment(OfficeAssignment officeAssignment, OfficeAssignment origOfficeAssignment)
38: {
39: try
40: {
41: schoolRepository.UpdateOfficeAssignment(officeAssignment, origOfficeAssignment);
42: }
43: catch (Exception ex)
44: {
45: //Include catch blocks for specific exceptions first,
46: //and handle or log the error as appropriate in each.
47: //Include a generic catch block like this one last.
48: throw ex;
49: }
50: }
Creating an OfficeAssignments Web Page
Create a new web page that uses the Site.Master master page and name it OfficeAssignments.aspx. Add the following markup to the Content control named Content2:
[!code-aspxMain]
1: <h2>Office Assignments</h2>
2: <asp:ObjectDataSource ID="OfficeAssignmentsObjectDataSource" runat="server" TypeName="ContosoUniversity.BLL.SchoolBL"
3: DataObjectTypeName="ContosoUniversity.DAL.OfficeAssignment" SelectMethod="GetOfficeAssignments"
4: DeleteMethod="DeleteOfficeAssignment" UpdateMethod="UpdateOfficeAssignment" ConflictDetection="CompareAllValues"
5: OldValuesParameterFormatString="orig{0}"
6: SortParameterName="sortExpression" OnUpdated="OfficeAssignmentsObjectDataSource_Updated">
7: </asp:ObjectDataSource>
8: <asp:ValidationSummary ID="OfficeAssignmentsValidationSummary" runat="server" ShowSummary="true"
9: DisplayMode="BulletList" Style="color: Red; width: 40em;" />
10: <asp:GridView ID="OfficeAssignmentsGridView" runat="server" AutoGenerateColumns="False"
11: DataSourceID="OfficeAssignmentsObjectDataSource" DataKeyNames="InstructorID,Timestamp"
12: AllowSorting="True">
13: <Columns>
14: <asp:CommandField ShowEditButton="True" ShowDeleteButton="True" ItemStyle-VerticalAlign="Top">
15: <ItemStyle VerticalAlign="Top"></ItemStyle>
16: </asp:CommandField>
17: <asp:TemplateField HeaderText="Instructor" SortExpression="Person.LastName">
18: <ItemTemplate>
19: <asp:Label ID="InstructorLastNameLabel" runat="server" Text='<%# Eval("Person.LastName") %>'></asp:Label>,
20: <asp:Label ID="InstructorFirstNameLabel" runat="server" Text='<%# Eval("Person.FirstMidName") %>'></asp:Label>
21: </ItemTemplate>
22: </asp:TemplateField>
23: <asp:DynamicField DataField="Location" HeaderText="Location" SortExpression="Location"/>
24: </Columns>
25: <SelectedRowStyle BackColor="LightGray"></SelectedRowStyle>
26: </asp:GridView>
Notice that in the DataKeyNames attribute, the markup specifies the Timestamp property as well as the record key (InstructorID). Specifying properties in the DataKeyNames attribute causes the control to save them in control state (which is similar to view state) so that the original values are available during postback processing.
If you didn’t save the Timestamp value, the Entity Framework would not have it for the Where clause of the SQL Update command. Consequently nothing would be found to update. As a result, the Entity Framework would throw an optimistic concurrency exception every time an OfficeAssignment entity is updated.
Open OfficeAssignments.aspx.cs and add the following using statement for the data access layer:
[!code-csharpMain]
1: using ContosoUniversity.DAL;
Add the following Page_Init method, which enables Dynamic Data functionality. Also add the following handler for the ObjectDataSource control’s Updated event in order to check for concurrency errors:
[!code-csharpMain]
1: protected void Page_Init(object sender, EventArgs e)
2: {
3: OfficeAssignmentsGridView.EnableDynamicData(typeof(OfficeAssignment));
4: }
5:
6: protected void OfficeAssignmentsObjectDataSource_Updated(object sender, ObjectDataSourceStatusEventArgs e)
7: {
8: if (e.Exception != null)
9: {
10: var concurrencyExceptionValidator = new CustomValidator();
11: concurrencyExceptionValidator.IsValid = false;
12: concurrencyExceptionValidator.ErrorMessage = "The record you attempted to " +
13: "update has been modified by another user since you last visited this page. " +
14: "Your update was canceled to allow you to review the other user's " +
15: "changes and determine if you still want to update this record.";
16: Page.Validators.Add(concurrencyExceptionValidator);
17: e.ExceptionHandled = true;
18: }
19: }
Testing Optimistic Concurrency in the OfficeAssignments Page
Run the OfficeAssignments.aspx page.

Click Edit in a row and change the value in the Location column.

Open a new browser window and run the page again (copy the URL from the first browser window to the second browser window).
Click Edit in the same row you edited earlier and change the Location value to something different.

In the second browser window, click Update.
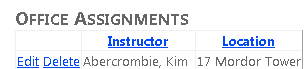
Switch to the first browser window and click Update.
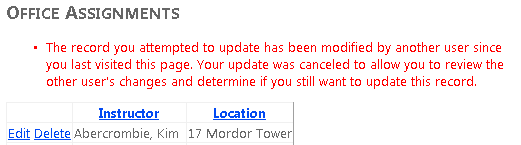
You see an error message and the Location value has been updated to show the value you changed it to in the second browser window.
Handling Concurrency with the EntityDataSource Control
The EntityDataSource control includes built-in logic that recognizes the concurrency settings in the data model and handles update and delete operations accordingly. However, as with all exceptions, you must handle OptimisticConcurrencyException exceptions yourself in order to provide a user-friendly error message.
Next, you will configure the Courses.aspx page (which uses an EntityDataSource control) to allow update and delete operations and to display an error message if a concurrency conflict occurs. The Course entity doesn’t have a concurrency tracking column, so you will use the same method that you did with the Department entity: track the values of all non-key properties.
Open the SchoolModel.edmx file. For the non-key properties of the Course entity (Title, Credits, and DepartmentID), set the Concurrency Mode property to Fixed. Then save and close the data model.
Open the Courses.aspx page and make the following changes:
In the
[!code-aspxMain]CoursesEntityDataSourcecontrol, addEnableUpdate="true"andEnableDelete="true"attributes. The opening tag for that control now resembles the following example:1: <asp:EntityDataSource ID="CoursesEntityDataSource" runat="server"
2: ContextTypeName="ContosoUniversity.DAL.SchoolEntities" EnableFlattening="false"
3: AutoGenerateWhereClause="True" EntitySetName="Courses"
4: EnableUpdate="true" EnableDelete="true">
In the
CoursesGridViewcontrol, change theDataKeyNamesattribute value to"CourseID,Title,Credits,DepartmentID". Then add aCommandFieldelement to theColumnselement that shows Edit and Delete buttons (<asp:CommandField ShowEditButton="True" ShowDeleteButton="True" />). TheGridViewcontrol now resembles the following example:[!code-aspxMain]
1: <asp:GridView ID="CoursesGridView" runat="server" AutoGenerateColumns="False"
2: DataKeyNames="CourseID,Title,Credits,DepartmentID"
3: DataSourceID="CoursesEntityDataSource" >
4: <Columns>
5: <asp:CommandField ShowEditButton="True" ShowDeleteButton="True" />
6: <asp:BoundField DataField="CourseID" HeaderText="CourseID" ReadOnly="True" SortExpression="CourseID" />
7: <asp:BoundField DataField="Title" HeaderText="Title" SortExpression="Title" />
8: <asp:BoundField DataField="Credits" HeaderText="Credits" SortExpression="Credits" />
9: </Columns>
10: </asp:GridView>
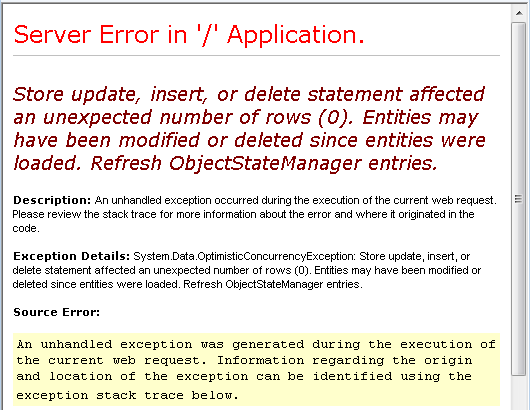
Run the page and create a conflict situation as you did before in the Departments page. Run the page in two browser windows, click Edit in the same line in each window, and make a different change in each one. Click Update in one window and then click Update in the other window. When you click Update the second time, you see the error page that results from an unhandled concurrency exception.
You handle this error in a manner very similar to how you handled it for the ObjectDataSource control. Open the Courses.aspx page, and in the CoursesEntityDataSource control, specify handlers for the Deleted and Updated events. The opening tag of the control now resembles the following example:
[!code-aspxMain]
1: <asp:EntityDataSource ID="CoursesEntityDataSource" runat="server"
2: ContextTypeName="ContosoUniversity.DAL.SchoolEntities" EnableFlattening="false"
3: AutoGenerateWhereClause="true" EntitySetName="Courses"
4: EnableUpdate="true" EnableDelete="true"
5: OnDeleted="CoursesEntityDataSource_Deleted"
6: OnUpdated="CoursesEntityDataSource_Updated">
Before the CoursesGridView control, add the following ValidationSummary control:
[!code-aspxMain]
1: <asp:ValidationSummary ID="CoursesValidationSummary" runat="server"
2: ShowSummary="true" DisplayMode="BulletList" />
In Courses.aspx.cs, add a using statement for the System.Data namespace, add a method that checks for concurrency exceptions, and add handlers for the EntityDataSource control’s Updated and Deleted handlers. The code will look like the following:
[!code-csharpMain]
1: using System.Data;
[!code-csharpMain]
1: protected void CoursesEntityDataSource_Updated(object sender, EntityDataSourceChangedEventArgs e)
2: {
3: CheckForOptimisticConcurrencyException(e, "update");
4: }
5:
6: protected void CoursesEntityDataSource_Deleted(object sender, EntityDataSourceChangedEventArgs e)
7: {
8: CheckForOptimisticConcurrencyException(e, "delete");
9: }
10:
11: private void CheckForOptimisticConcurrencyException(EntityDataSourceChangedEventArgs e, string function)
12: {
13: if (e.Exception != null && e.Exception is OptimisticConcurrencyException)
14: {
15: var concurrencyExceptionValidator = new CustomValidator();
16: concurrencyExceptionValidator.IsValid = false;
17: concurrencyExceptionValidator.ErrorMessage =
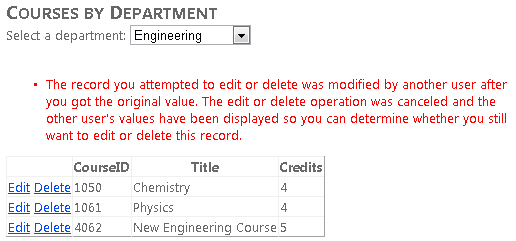
18: "The record you attempted to edit or delete was modified by another " +
19: "user after you got the original value. The edit or delete operation was canceled " +
20: "and the other user's values have been displayed so you can " +
21: "determine whether you still want to edit or delete this record.";
22: Page.Validators.Add(concurrencyExceptionValidator);
23: e.ExceptionHandled = true;
24: }
25: }
The only difference between this code and what you did for the ObjectDataSource control is that in this case the concurrency exception is in the Exception property of the event arguments object rather than in that exception’s InnerException property.
Run the page and create a concurrency conflict again. This time you see an error message:
This completes the introduction to handling concurrency conflicts. The next tutorial will provide guidance on how to improve performance in a web application that uses the Entity Framework.
 )
)
|
|