Part 1: Overview and Creating the Project
by Mike Wasson
Entity Framework is an object/relational mapping framework. It maps the domain objects in your code to entities in a relational database. For the most part, you do not have to worry about the database layer, because Entity Framework takes care of it for you. Your code manipulates the objects, and changes are persisted to a database.
About the Tutorial
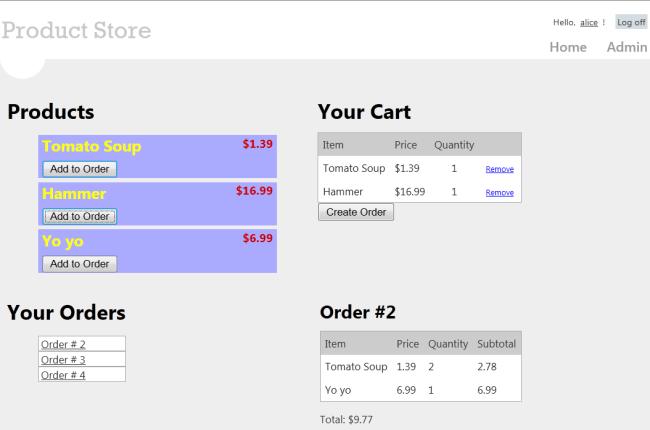
In this tutorial, you will create a simple store application. There are two main parts to the application. Normal users can view products and create orders:
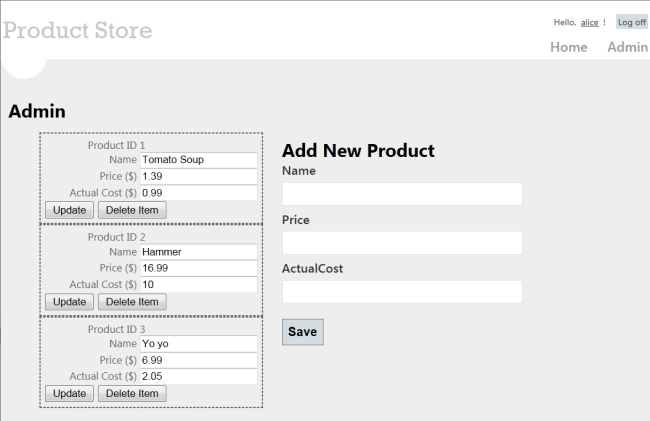
Administrators can create, delete, or edit products:
Skills You’ll Learn
Here’s what you’ll learn:
- How to use Entity Framework with ASP.NET Web API.
- How to use knockout.js to create a dynamic client UI.
- How to use forms authentication with Web API to authenticate users.
Although this tutorial is self-contained, you might want to read the following tutorials first:
Some knowledge of ASP.NET MVC is also helpful.
Overview
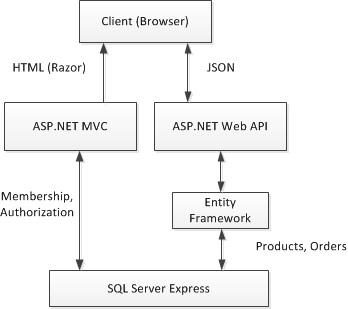
At a high level, here is the architecture of the application:
- ASP.NET MVC generates the HTML pages for the client.
- ASP.NET Web API exposes CRUD operations on the data (products and orders).
- Entity Framework translates the C# models used by Web API into database entities.
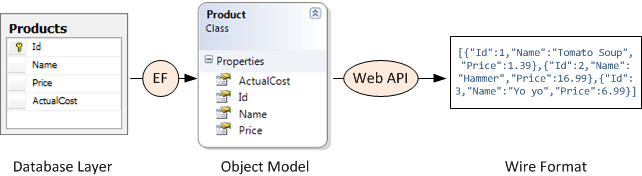
The following diagram shows how the domain objects are represented at various layers of the application: The database layer, the object model, and finally the wire format, which is used to transmit data to the client via HTTP.
Create the Visual Studio Project
You can create the tutorial project using either Visual Web Developer Express or the full version of Visual Studio.
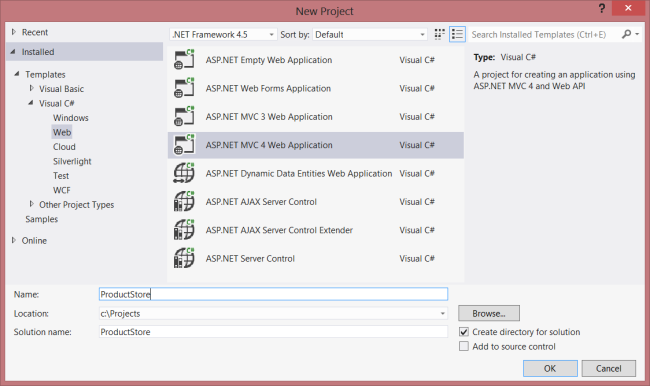
From the Start page, click New Project.
In the Templates pane, select Installed Templates and expand the Visual C# node. Under Visual C#, select Web. In the list of project templates, select ASP.NET MVC 4 Web Application. Name the project “ProductStore” and click OK.
In the New ASP.NET MVC 4 Project dialog, select Internet Application and click OK.
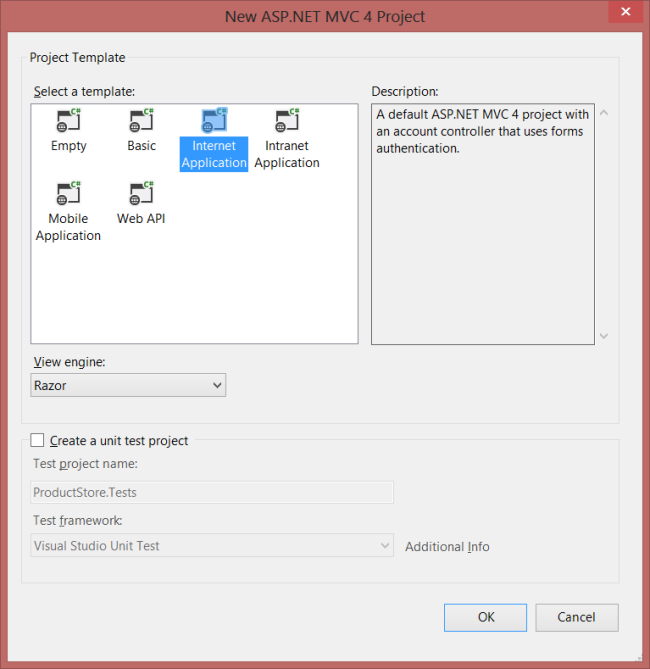
The “Internet Application” template creates an ASP.NET MVC application that supports forms authentication. If you run the application now, it already has some features:
- New users can register by clicking the “Register” link in the upper right corner.
- Registered users can log in by clicking the “Log in” link.
Membership information is persisted in a database that gets created automatically. For more information about forms authentication in ASP.NET MVC, see Walkthrough: Using Forms Authentication in ASP.NET MVC.
Update the CSS File
This step is cosmetic, but it will make the pages render like the earlier screen shots.
In Solution Explorer, expand the Content folder and open the file named Site.css. Add the following CSS styles:
[!code-cssMain]
1: .content {
2: clear: both;
3: width: 90%;
4: }
5:
6: li {
7: list-style-type: none;
8: }
9:
10: #products li {
11: width: 300px;
12: background-color: #aaf;
13: font-size: 1.5em;
14: font-weight: bold;
15: color: #ff0;
16: margin: 0 0 5px 0;
17: padding: 0 5px 0 5px;
18: }
19:
20: .price {
21: float: right;
22: color: #c00;
23: font-size: 0.75em;
24: }
25:
26: .details thead td {
27: background-color: #CCCCCC;
28: color: #333333;
29: }
30:
31: .details td {
32: padding: 6px;
33: }
34:
35: .details td.qty {
36: text-align: center;
37: }
38:
39: #cart a {
40: color: Blue;
41: font-size: .75em;
42: }
43:
44: #update-products li {
45: padding: 5px;
46: color: #666;
47: border-style: dashed;
48: border-width: 2px;
49: border-color: #666;
50: }
51:
52: #update-products li .item {
53: width: 120px;
54: display: inline-block;
55: text-align: right;
56: }
 )
)
|
|