Create an OData v4 Endpoint Using ASP.NET Web API 2.2
by Mike Wasson
The Open Data Protocol (OData) is a data access protocol for the web. OData provides a uniform way to query and manipulate data sets through CRUD operations (create, read, update, and delete).
ASP.NET Web API supports both v3 and v4 of the protocol. You can even have a v4 endpoint that runs side-by-side with a v3 endpoint.
This tutorial shows how to create an OData v4 endpoint that supports CRUD operations.
Software versions used in the tutorial
- Web API 2.2
- OData v4
- Visual Studio 2013 Update 2
- Entity Framework 6
- .NET 4.5
Tutorial versions
For the OData Version 3, see Creating an OData v3 Endpoint.
Create the Visual Studio Project
In Visual Studio, from the File menu, select New > Project.
Expand Installed > Templates > Visual C# > Web, and select the ASP.NET Web Application template. Name the project “ProductService”.
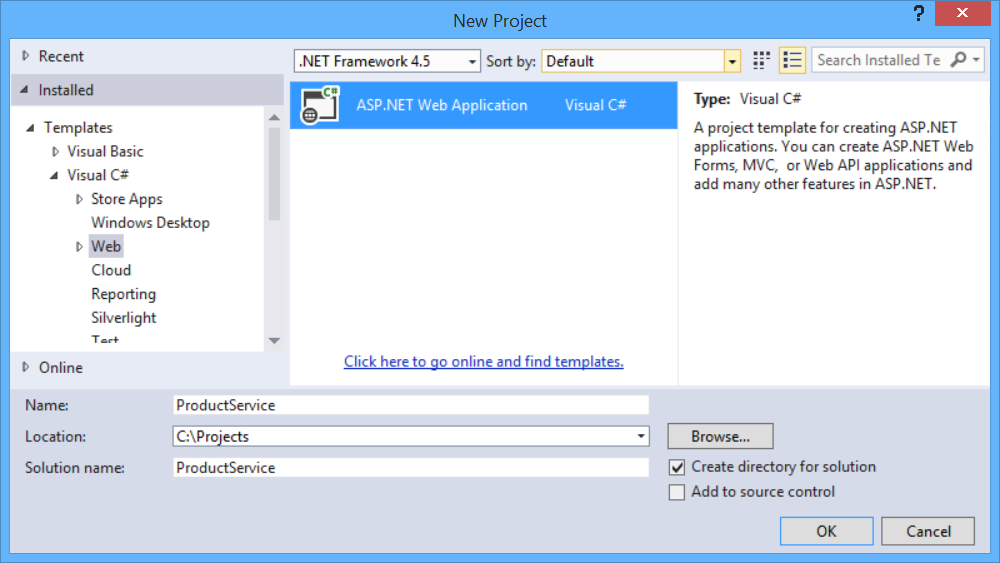
In the New Project dialog, select the Empty template. Under “Add folders and core references…”, click Web API. Click OK.

Install the OData Packages
From the Tools menu, select NuGet Package Manager > Package Manager Console. In the Package Manager Console window, type:
[!code-consoleMain]
1: Install-Package Microsoft.AspNet.Odata
This command installs the latest OData NuGet packages.
Add a Model Class
A model is an object that represents a data entity in your application.
In Solution Explorer, right-click the Models folder. From the context menu, select Add > Class.
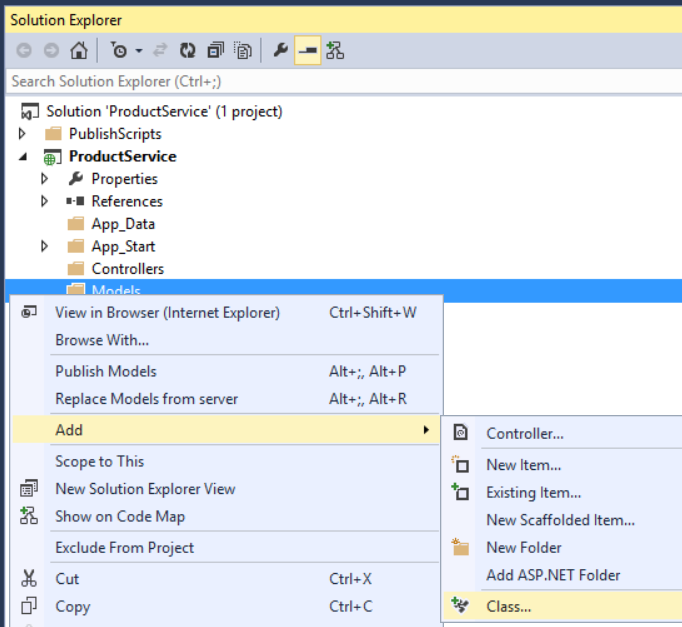
[!NOTE] By convention, model classes are placed in the Models folder, but you don’t have to follow this convention in your own projects.
Name the class Product. In the Product.cs file, replace the boilerplate code with the following:
[!code-csharpMain]
1: namespace ProductService.Models
2: {
3: public class Product
4: {
5: public int Id { get; set; }
6: public string Name { get; set; }
7: public decimal Price { get; set; }
8: public string Category { get; set; }
9: }
10: }
The Id property is the entity key. Clients can query entities by key. For example, to get the product with ID of 5, the URI is /Products(5). The Id property will also be the primary key in the back-end database.
Enable Entity Framework
For this tutorial, we’ll use Entity Framework (EF) Code First to create the back-end database.
[!NOTE] Web API OData does not require EF. Use any data-access layer that can translate database entities into models.
First, install the NuGet package for EF. From the Tools menu, select NuGet Package Manager > Package Manager Console. In the Package Manager Console window, type:
[!code-consoleMain]
1: Install-Package EntityFramework
Open the Web.config file, and add the following section inside the configuration element, after the configSections element.
[!code-xmlMain]
1: <configuration>
2: <configSections>
3: <!-- ... -->
4: </configSections>
5:
6: <!-- Add this: -->
7: <connectionStrings>
8: <add name="ProductsContext" connectionString="Data Source=(localdb)\v11.0;
9: Initial Catalog=ProductsContext; Integrated Security=True; MultipleActiveResultSets=True;
10: AttachDbFilename=|DataDirectory|ProductsContext.mdf"
11: providerName="System.Data.SqlClient" />
12: </connectionStrings>
This setting adds a connection string for a LocalDB database. This database will be used when you run the app locally.
Next, add a class named ProductsContext to the Models folder:
[!code-csharpMain]
1: using System.Data.Entity;
2: namespace ProductService.Models
3: {
4: public class ProductsContext : DbContext
5: {
6: public ProductsContext()
7: : base("name=ProductsContext")
8: {
9: }
10: public DbSet<Product> Products { get; set; }
11: }
12: }
In the constructor, "name=ProductsContext" gives the name of the connection string.
Configure the OData Endpoint
Open the file App_Start/WebApiConfig.cs. Add the following using statements:
[!code-csharpMain]
1: using ProductService.Models;
2: using System.Web.OData.Builder;
3: using System.Web.OData.Extensions;
Then add the following code to the Register method:
[!code-csharpMain]
1: public static class WebApiConfig
2: {
3: public static void Register(HttpConfiguration config)
4: {
5: // New code:
6: ODataModelBuilder builder = new ODataConventionModelBuilder();
7: builder.EntitySet<Product>("Products");
8: config.MapODataServiceRoute(
9: routeName: "ODataRoute",
10: routePrefix: null,
11: model: builder.GetEdmModel());
12: }
13: }
This code does two things:
- Creates an Entity Data Model (EDM).
- Adds a route.
An EDM is an abstract model of the data. The EDM is used to create the service metadata document. The ODataConventionModelBuilder class creates an EDM by using default naming conventions. This approach requires the least code. If you want more control over the EDM, you can use the ODataModelBuilder class to create the EDM by adding properties, keys, and navigation properties explicitly.
A route tells Web API how to route HTTP requests to the endpoint. To create an OData v4 route, call the MapODataServiceRoute extension method.
If your application has multiple OData endpoints, create a separate route for each. Give each route a unique route name and prefix.
Add the OData Controller
A controller is a class that handles HTTP requests. You create a separate controller for each entity set in your OData service. In this tutorial, you will create one controller, for the Product entity.
In Solution Explorer, right-click the Controllers folder and select Add > Class. Name the class ProductsController.
[!NOTE] The version of this tutorial for OData v3 uses the Add Controller scaffolding. Currently, there is no scaffolding for OData v4.
Replace the boilerplate code in ProductsController.cs with the following.
[!code-csharpMain]
1: using ProductService.Models;
2: using System.Data.Entity;
3: using System.Data.Entity.Infrastructure;
4: using System.Linq;
5: using System.Net;
6: using System.Threading.Tasks;
7: using System.Web.Http;
8: using System.Web.OData;
9: namespace ProductService.Controllers
10: {
11: public class ProductsController : ODataController
12: {
13: ProductsContext db = new ProductsContext();
14: private bool ProductExists(int key)
15: {
16: return db.Products.Any(p => p.Id == key);
17: }
18: protected override void Dispose(bool disposing)
19: {
20: db.Dispose();
21: base.Dispose(disposing);
22: }
23: }
24: }
The controller uses the ProductsContext class to access the database using EF. Notice that the controller overrides the Dispose method to dispose of the ProductsContext.
This is the starting point for the controller. Next, we’ll add methods for all of the CRUD operations.
Querying the Entity Set
Add the following methods to ProductsController.
[!code-csharpMain]
1: [EnableQuery]
2: public IQueryable<Product> Get()
3: {
4: return db.Products;
5: }
6: [EnableQuery]
7: public SingleResult<Product> Get([FromODataUri] int key)
8: {
9: IQueryable<Product> result = db.Products.Where(p => p.Id == key);
10: return SingleResult.Create(result);
11: }
The parameterless version of the Get method returns the entire Products collection. The Get method with a key parameter looks up a product by its key (in this case, the Id property).
The [EnableQuery] attribute enables clients to modify the query, by using query options such as $filter, $sort, and $page. For more information, see Supporting OData Query Options.
Adding an Entity to the Entity Set
To enable clients to add a new product to the database, add the following method to ProductsController.
[!code-csharpMain]
1: public async Task<IHttpActionResult> Post(Product product)
2: {
3: if (!ModelState.IsValid)
4: {
5: return BadRequest(ModelState);
6: }
7: db.Products.Add(product);
8: await db.SaveChangesAsync();
9: return Created(product);
10: }
Updating an Entity
OData supports two different semantics for updating an entity, PATCH and PUT.
- PATCH performs a partial update. The client specifies just the properties to update.
- PUT replaces the entire entity.
The disadvantage of PUT is that the client must send values for all of the properties in the entity, including values that are not changing. The OData spec states that PATCH is preferred.
In any case, here is the code for both PATCH and PUT methods:
[!code-csharpMain]
1: public async Task<IHttpActionResult> Patch([FromODataUri] int key, Delta<Product> product)
2: {
3: if (!ModelState.IsValid)
4: {
5: return BadRequest(ModelState);
6: }
7: var entity = await db.Products.FindAsync(key);
8: if (entity == null)
9: {
10: return NotFound();
11: }
12: product.Patch(entity);
13: try
14: {
15: await db.SaveChangesAsync();
16: }
17: catch (DbUpdateConcurrencyException)
18: {
19: if (!ProductExists(key))
20: {
21: return NotFound();
22: }
23: else
24: {
25: throw;
26: }
27: }
28: return Updated(entity);
29: }
30: public async Task<IHttpActionResult> Put([FromODataUri] int key, Product update)
31: {
32: if (!ModelState.IsValid)
33: {
34: return BadRequest(ModelState);
35: }
36: if (key != update.Id)
37: {
38: return BadRequest();
39: }
40: db.Entry(update).State = EntityState.Modified;
41: try
42: {
43: await db.SaveChangesAsync();
44: }
45: catch (DbUpdateConcurrencyException)
46: {
47: if (!ProductExists(key))
48: {
49: return NotFound();
50: }
51: else
52: {
53: throw;
54: }
55: }
56: return Updated(update);
57: }
In the case of PATCH, the controller uses the Delta<T> type to track the changes.
Deleting an Entity
To enable clients to delete a product from the database, add the following method to ProductsController.
[!code-csharpMain]
1: public async Task<IHttpActionResult> Delete([FromODataUri] int key)
2: {
3: var product = await db.Products.FindAsync(key);
4: if (product == null)
5: {
6: return NotFound();
7: }
8: db.Products.Remove(product);
9: await db.SaveChangesAsync();
10: return StatusCode(HttpStatusCode.NoContent);
11: }
 )
)
|
|