SignalR Scaleout with Redis
by Mike Wasson, Patrick Fletcher
Software versions used in this topic
- Visual Studio 2013
- .NET 4.5
- SignalR version 2
Previous versions of this topic
For information about earlier versions of SignalR, see SignalR Older Versions.
Questions and comments
Please leave feedback on how you liked this tutorial and what we could improve in the comments at the bottom of the page. If you have questions that are not directly related to the tutorial, you can post them to the ASP.NET SignalR forum or StackOverflow.com.
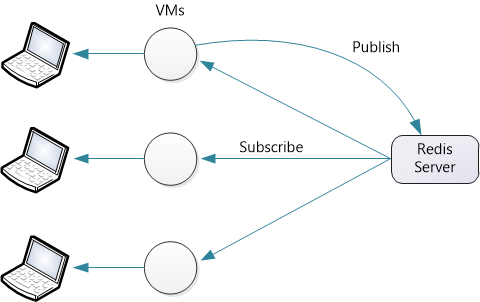
In this tutorial, you will use Redis to distribute messages across a SignalR application that is deployed on two separate IIS instances.
Redis is an in-memory key-value store. It also supports a messaging system with a publish/subscribe model. The SignalR Redis backplane uses the pub/sub feature to forward messages to other servers.
For this tutorial, you will use three servers:
- Two servers running Windows, which you will use to deploy a SignalR application.
- One server running Linux, which you will use to run Redis. For the screenshots in this tutorial, I used Ubuntu 12.04 TLS.
If you don’t have three physical servers to use, you can create VMs on Hyper-V. Another option is to create VMs on Azure.
Although this tutorial uses the official Redis implementation, there is also a Windows port of Redis from MSOpenTech. Setup and configuration are different, but otherwise the steps are the same.
[!NOTE]
SignalR scaleout with Redis does not support Redis clusters.
Overview
Before we get to the detailed tutorial, here is a quick overview of what you will do.
- Install Redis and start the Redis server.
Add these NuGet packages to your application:
- Create a SignalR application.
Add the following code to Startup.cs to configure the backplane:
[!code-csharpMain]
1: public class Startup
2: {3: public void Configuration(IAppBuilder app)
4: {5: // Any connection or hub wire up and configuration should go here
6: GlobalHost.DependencyResolver.UseRedis("server", port, "password", "AppName");
7: app.MapSignalR();8: }9: }
Ubuntu on Hyper-V
Using Windows Hyper-V, you can easily create an Ubuntu VM on Windows Server.
Download the Ubuntu ISO from http://www.ubuntu.com.
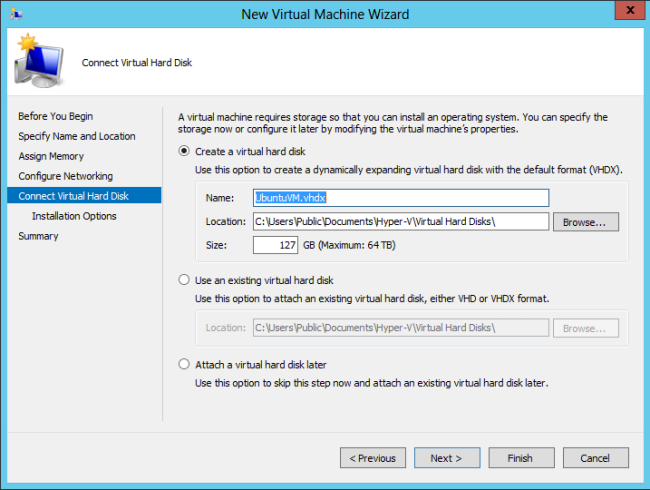
In Hyper-V, add a new VM. In the Connect Virtual Hard Disk step, select Create a virtual hard disk.
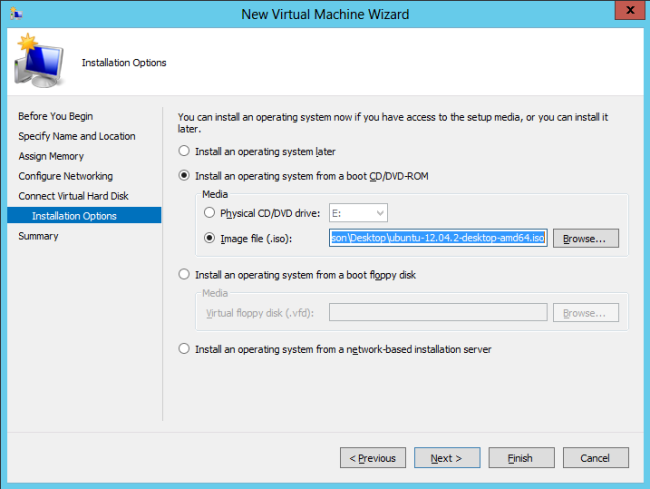
In the Installation Options step, select Image file (.iso), click Browse, and browse to the Ubuntu installation ISO.
Install Redis
Follow the steps at http://redis.io/download to download and build Redis.
[!code-consoleMain]
1: wget http://redis.googlecode.com/files/redis-2.6.12.tar.gz
2: tar xzf redis-2.6.12.tar.gz
3: cd redis-2.6.12
4: make
This builds the Redis binaries in the src directory.
By default, Redis does not require a password. To set a password, edit the redis.conf file, which is located in the root directory of the source code. (Make a backup copy of the file before you edit it!) Add the following directive to redis.conf:
[!code-powershellMain]
1: requirepass YourStrongPassword1234
Now start the Redis server:
[!code-cssMain]
1: src/redis-server redis.conf
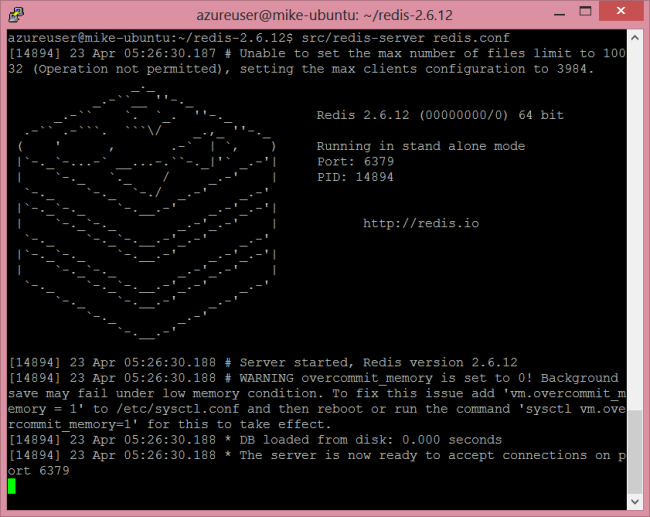
Open port 6379, which is the default port that Redis listens on. (You can change the port number in the configuration file.)
Create the SignalR Application
Create a SignalR application by following either of these tutorials:
Next, we’ll modify the chat application to support scaleout with Redis. First, add the SignalR.Redis NuGet package to your project. In Visual Studio, from the Tools menu, select Library Package Manager, then select Package Manager Console. In the Package Manager Console window, enter the following command:
[!code-powershellMain]
1: Install-Package Microsoft.AspNet.SignalR.Redis
Next, open the Startup.cs file. Add the following code to the Configuration method:
[!code-csharpMain]
1: public class Startup
2: {
3: public void Configuration(IAppBuilder app)
4: {
5: // Any connection or hub wire up and configuration should go here
6: GlobalHost.DependencyResolver.UseRedis("server", port, "password", "AppName");
7: app.MapSignalR();
8: }
9: }
- “server” is the name of the server that is running Redis.
- port is the port number
- “password” is the password that you defined in the redis.conf file.
- “AppName” is any string. SignalR creates a Redis pub/sub channel with this name.
For example:
[!code-csharpMain]
1: GlobalHost.DependencyResolver.UseRedis("redis-server.cloudapp.net", 6379,
2: "MyStrongPassword1234", "ChatApp");
Deploy and Run the Application
Prepare your Windows Server instances to deploy the SignalR application.
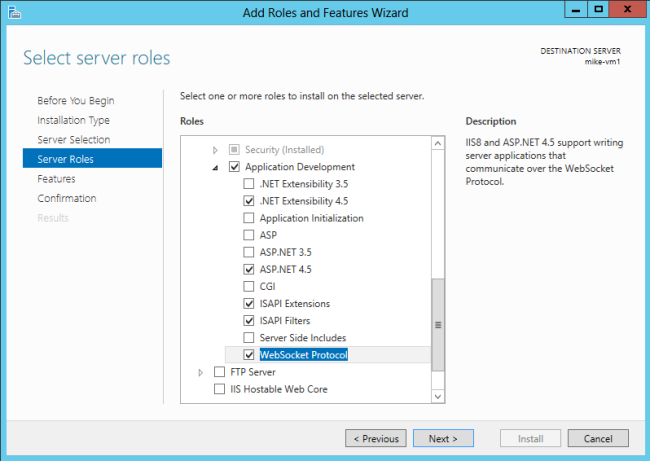
Add the IIS role. Include “Application Development” features, including the WebSocket Protocol.
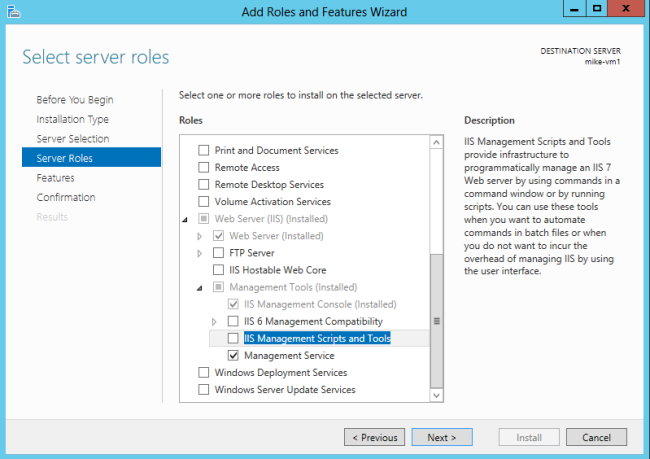
Also include the Management Service (listed under “Management Tools”).
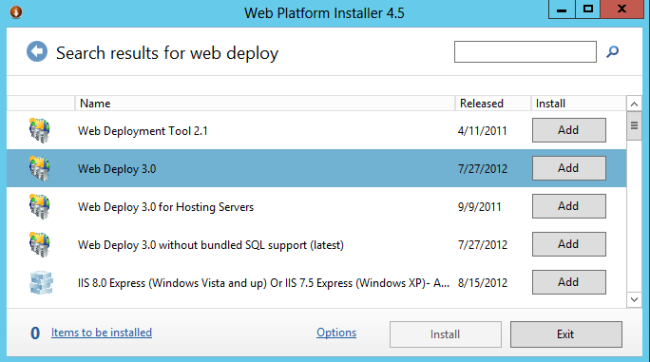
Install Web Deploy 3.0. When you run IIS Manager, it will prompt you to install Microsoft Web Platform, or you can download the intstaller. In the Platform Installer, search for Web Deploy and install Web Deploy 3.0
Check that the Web Management Service is running. If not, start the service. (If you don’t see Web Management Service in the list of Windows services, make sure that you installed the Management Service when you added the IIS role.)
By default, the Web Management Service listens on TCP port 8172. In Windows Firewall, create a new inbound rule to allow TCP traffic on port 8172. For more information, see Configuring Firewall Rules. (If you are hosting the VMs on Azure, you can do this directly in the Azure portal. See How to Set Up Endpoints to a Virtual Machine.)
Now you are ready to deploy the Visual Studio project from your development machine to the server. In Solution Explorer, right-click the solution and click Publish.
For more detailed documentation about web deployment, see Web Deployment Content Map for Visual Studio and ASP.NET.
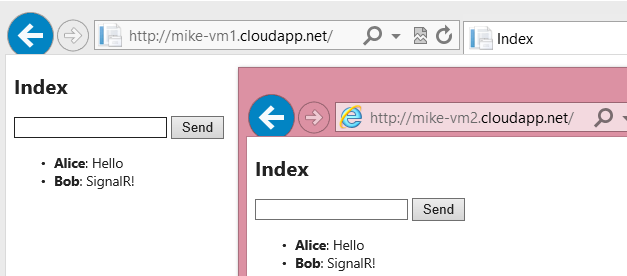
If you deploy the application to two servers, you can open each instance in a separate browser window and see that they each receive SignalR messages from the other. (Of course, in a production environment, the two servers would sit behind a load balancer.)
If you’re curious to see the messages that are sent to Redis, you can use the redis-cli client, which installs with Redis.
[!code-xmlMain]
1: redis-cli -a password
2: SUBSCRIBE ChatApp

 )
)
|
|