Examining how ASP.NET MVC scaffolds the DropDownList Helper
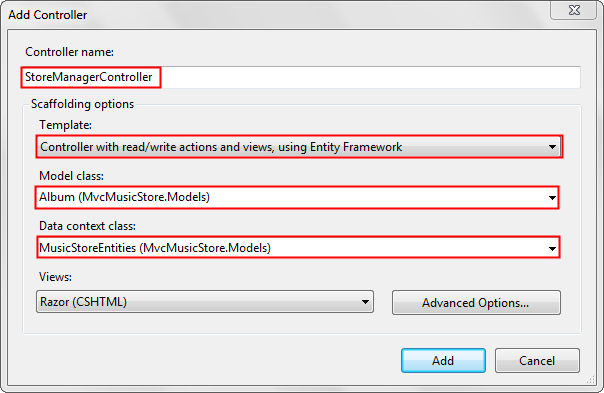
In Solution Explorer, right-click the Controllers folder and then select Add Controller. Name the controller StoreManagerController. Set the options for the Add Controller dialog as shown in the image below.
Edit the StoreManager.cshtml view and remove AlbumArtUrl. Removing AlbumArtUrl will make the presentation more readable. The completed code is shown below.
[!code-cshtmlMain]
1: @model IEnumerable<MvcMusicStore.Models.Album>
2:
3: @{
4:
5: ViewBag.Title = "Index";
6:
7: }
8:
9: <h2>Index</h2>
10:
11: <p>
12:
13: @Html.ActionLink("Create New", "Create")
14:
15: </p>
16:
17: <table>
18:
19: <tr>
20:
21: <th>
22:
23: Genre
24:
25: </th>
26:
27: <th>
28:
29: Artist
30:
31: </th>
32:
33: <th>
34:
35: Title
36:
37: </th>
38:
39: <th>
40:
41: Price
42:
43: </th>
44:
45: <th></th>
46:
47: </tr>
48:
49: @foreach (var item in Model) {
50:
51: <tr>
52:
53: <td>
54:
55: @Html.DisplayFor(modelItem => item.Genre.Name)
56:
57: </td>
58:
59: <td>
60:
61: @Html.DisplayFor(modelItem => item.Artist.Name)
62:
63: </td>
64:
65: <td>
66:
67: @Html.DisplayFor(modelItem => item.Title)
68:
69: </td>
70:
71: <td>
72:
73: @Html.DisplayFor(modelItem => item.Price)
74:
75: </td>
76:
77: <td>
78:
79: @Html.ActionLink("Edit", "Edit", new { id=item.AlbumId }) |
80:
81: @Html.ActionLink("Details", "Details", new { id=item.AlbumId }) |
82:
83: @Html.ActionLink("Delete", "Delete", new { id=item.AlbumId })
84:
85: </td>
86:
87: </tr>
88:
89: }
90:
91: </table>
Open the Controllers.cs file and find the Index method. Add the OrderBy clause so the albums will be sorted by price. The complete code is shown below.
[!code-csharpMain]
1: public ViewResult Index()
2: {
3:
4: var albums = db.Albums.Include(a => a.Genre).Include(a => a.Artist)
5:
6: .OrderBy(a => a.Price);
7:
8: return View(albums.ToList());
9:
10: }
Sorting by price will make it easier to test changes to the database. When you are testing the edit and create methods, you can use a low price so the saved data will appear first.
Open the StoreManager.cshtml file. Add the following line just after the legend tag.
[!code-cshtmlMain]
1: @Html.HiddenFor(model => model.AlbumId)
The following code shows the context of this change:
[!code-cshtmlMain]
1: @using (Html.BeginForm()) {
2:
3: @Html.ValidationSummary(true)
4:
5: <fieldset>
6:
7: <legend>Album</legend>
8:
9: @Html.HiddenFor(model => model.AlbumId)
10:
11: <div class="editor-label">
12:
13: @Html.LabelFor(model => model.GenreId, "Genre")
14:
15: </div>
16:
17: <div class="editor-field">
18:
19: @Html.DropDownList("GenreId", String.Empty)
20:
21: @Html.ValidationMessageFor(model => model.GenreId)
22:
23: </div>
24:
25: <!-- Items removed for brevity. -->
26:
27: }
The AlbumId is required to make changes to an album record.
Press CTRL+F5 to run the application. Select to the Admin link, then select the Create New link to create a new album. Verify the album information was saved. Edit an album and verify the changes you made are persisted.
The Album Schema
The StoreManager controller created by the MVC scaffolding mechanism allows CRUD (Create, Read, Update, Delete) access to the albums in the music store database. The schema for album information is shown below:
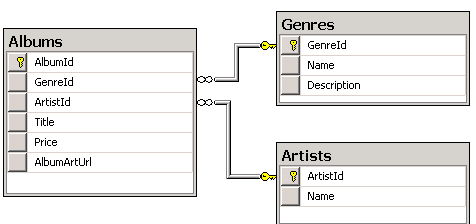
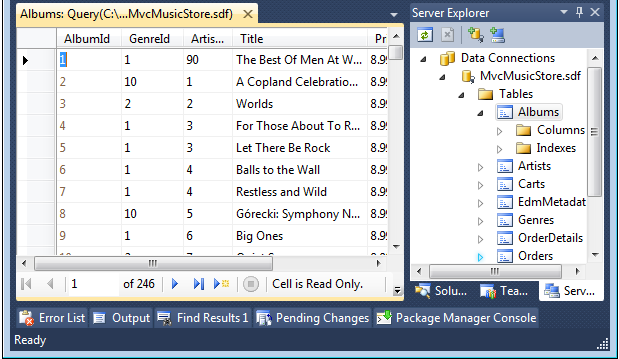
The Albums table does not store the album genre and description, it stores a foreign key to the Genres table. The Genres table contains the genre name and description. Likewise, the Albums table doesn???t contain the album artists name, but a foreign key to the Artists table. The Artists table contains the artist???s name. If you examine the data in the Albums table, you can see each row contains a foreign key to the Genres table and a foreign key to the Artists table. The image below show some table data from the Albums table.
The HTML Select Tag
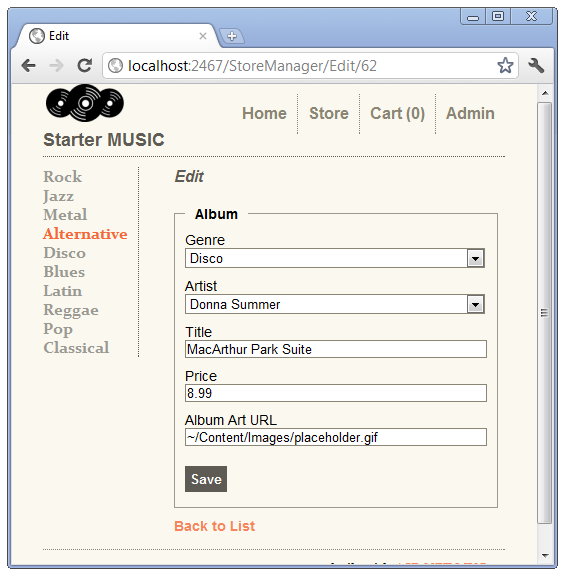
The HTML <select> element (created by the HTML DropDownList helper) is used to display a complete list of values (such as the list of genres). For edit forms, when the current value is known, the select list can display the current value. We saw this previously when we set the selected value to Comedy. The select list is ideal for displaying category or foreign key data. The <select> element for the Genre foreign key displays the list of possible genre names, but when you save the form the Genre property is updated with the Genre foreign key value, not the displayed genre name. In the image below, the genre selected is Disco and the artist is Donna Summer.
Examining the ASP.NET MVC Scaffolded Code
Open the Controllers.cs file and find the HTTP GET Create method.
[!code-csharpMain]
1: public ActionResult Create()
2:
3: {
4:
5: ViewBag.GenreId = new SelectList(db.Genres, "GenreId", "Name");
6:
7: ViewBag.ArtistId = new SelectList(db.Artists, "ArtistId", "Name");
8:
9: return View();
10:
11: }
The Create method adds two SelectList objects to the ViewBag, one to contain the genre information, and one to contain the artist information. The SelectList constructor overload used above takes three arguments:
[!code-csharpMain]
1: public SelectList(
2:
3: IEnumerable items,
4:
5: string dataValueField,
6:
7: string dataTextField
8:
9: )
- items: An IEnumerable containing the items in the list. In the example above, the list of genres returned by
db.Genres. - dataValueField: The name of the property in the IEnumerable list that contains the key value. In the example above,
GenreIdandArtistId. - dataTextField: The name of the property in the IEnumerable list that contains the information to display. In both the artists and genre table, the
namefield is used.
Open the Views.cshtml file and examine the Html.DropDownList helper markup for the genre field.
[!code-cshtmlMain]
1: @model MvcMusicStore.Models.Album
2:
3: @* Markup removed for clarity.*@
4:
5: @Html.DropDownList("GenreId", String.Empty)
The first line shows that the create view takes an Album model. In the Create method shown above, no model was passed, so the view gets a null Album model. At this point we are creating a new album so we don???t have any Album data for it.
The Html.DropDownList overload shown above takes the name of the field to bind to the model. It also uses this name to look for a ViewBag object containing a SelectList object. Using this overload, you are required to name the ViewBag SelectList object GenreId. The second parameter (String.Empty) is the text to display when no item is selected. This is exactly what we want when creating a new album. If you removed the second parameter and used the following code:
[!code-cshtmlMain]
1: @Html.DropDownList("GenreId")
The select list would default to the first element, or Rock in our sample.

Examining the HTTP POST Create method.
[!code-csharpMain]
1: //
2:
3: // POST: /StoreManager/Create
4:
5: [HttpPost]
6:
7: public ActionResult Create(Album album)
8:
9: {
10:
11: if (ModelState.IsValid)
12:
13: {
14:
15: db.Albums.Add(album);
16:
17: db.SaveChanges();
18:
19: return RedirectToAction("Index");
20:
21: }
22:
23: ViewBag.GenreId = new SelectList(db.Genres, "GenreId", "Name",
24:
25: album.GenreId);
26:
27: ViewBag.ArtistId = new SelectList(db.Artists, "ArtistId", "Name",
28:
29: album.ArtistId);
30:
31: return View(album);
32:
33: }
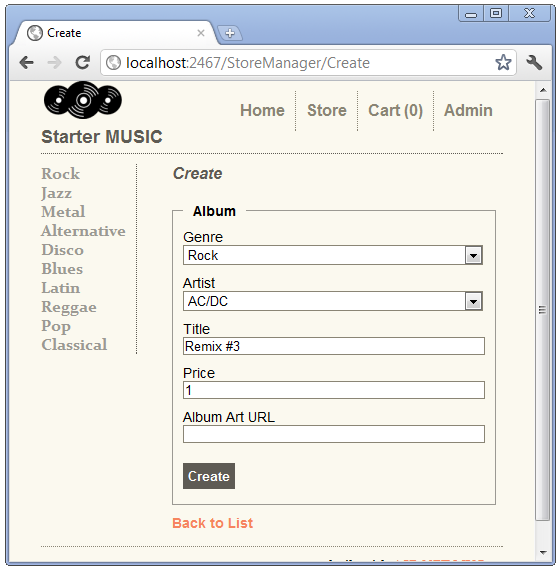
This overload of the Create method takes an album object, created by the ASP.NET MVC model binding system from the form values posted. When you submit a new album, if model state is valid and there are no database errors, the new album is added the database. The following image shows the creation of a new album.
You can use the fiddler tool to examine the posted form values that ASP.NET MVC model binding uses to create the album object.
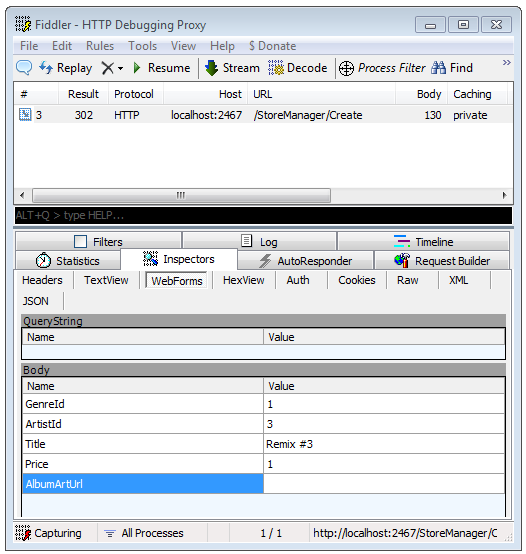 .
.
Refactoring the ViewBag SelectList Creation
Both the Edit methods and the HTTP POST Create method have identical code to set up the SelectList in the ViewBag. In the spirit of DRY, we will refactor this code. We???ll make use of this refactored code later.
Create a new method to add a genre and artist SelectList to the ViewBag.
[!code-csharpMain]
1: private void SetGenreArtistViewBag(int? GenreID = null, int? ArtistID = null) {
2:
3: if (GenreID == null)
4:
5: ViewBag.GenreId = new SelectList(db.Genres, "GenreId", "Name");
6:
7: else
8:
9: ViewBag.GenreId = new SelectList(db.Genres.ToArray(), "GenreId", "Name", GenreID);
10:
11: if (ArtistID == null)
12:
13: ViewBag.ArtistId = new SelectList(db.Artists, "ArtistId", "Name");
14:
15: else
16:
17: ViewBag.ArtistId = new SelectList(db.Artists, "ArtistId", "Name", ArtistID);
18:
19: }
Replace the two lines setting the ViewBag in each of the Create and Edit methods with a call to the SetGenreArtistViewBag method. The completed code is shown below.
[!code-csharpMain]
1: //
2:
3: // GET: /StoreManager/Create
4:
5: public ActionResult Create() {
6:
7: SetGenreArtistViewBag();
8:
9: return View();
10:
11: }
12:
13: //
14:
15: // POST: /StoreManager/Create
16:
17: [HttpPost]
18:
19: public ActionResult Create(Album album) {
20:
21: if (ModelState.IsValid) {
22:
23: db.Albums.Add(album);
24:
25: db.SaveChanges();
26:
27: return RedirectToAction("Index");
28:
29: }
30:
31: SetGenreArtistViewBag(album.GenreId, album.ArtistId);
32:
33: return View(album);
34:
35: }
36:
37: //
38:
39: // GET: /StoreManager/Edit/5
40:
41: public ActionResult Edit(int id) {
42:
43: Album album = db.Albums.Find(id);
44:
45: SetGenreArtistViewBag(album.GenreId, album.ArtistId);
46:
47: return View(album);
48:
49: }
50:
51: //
52:
53: // POST: /StoreManager/Edit/5
54:
55: [HttpPost]
56:
57: public ActionResult Edit(Album album) {
58:
59: if (ModelState.IsValid) {
60:
61: db.Entry(album).State = EntityState.Modified;
62:
63: db.SaveChanges();
64:
65: return RedirectToAction("Index");
66:
67: }
68:
69: SetGenreArtistViewBag(album.GenreId, album.ArtistId);
70:
71: return View(album);
72:
73: }
Create a new album and edit an album to verify the changes work.
Explicitly Passing the SelectList to the DropDownList
The create and edit views created by the ASP.NET MVC scaffolding use the following DropDownList overload:
[!code-csharpMain]
1: public static MvcHtmlString DropDownList(
2:
3: this HtmlHelper htmlHelper,
4:
5: string name, // The name of the ViewModel property to bind.
6:
7: string optionLabel // The string added to the top of the list
8:
9: // typically String.Empty or "Select a Genre"
10:
11: )
The DropDownList markup for the create view is shown below.
[!code-cshtmlMain]
1: @Html.DropDownList("GenreId", String.Empty)
Because the ViewBag property for the SelectList is named GenreId, the DropDownList helper will use the GenreIdSelectList in the ViewBag. In the following DropDownList overload, the SelectList is explicitly passed in.
[!code-csharpMain]
1: public static MvcHtmlString DropDownList(
2:
3: this HtmlHelper htmlHelper,
4:
5: string name, // The name of the ViewModel property to bind.
6:
7: IEnumerable selectList // The SelectList
8:
9: )
Open the Views.cshtml file, and change the DropDownList call to explicitly pass in the SelectList, using the overload above. Do this for the Genre category. The completed code is shown below:
[!code-cshtmlMain]
1: @Html.DropDownList("GenreId", ViewBag.GenreId as SelectList)
Run the application and click the Admin link, then navigate to a Jazz album and select the Edit link.
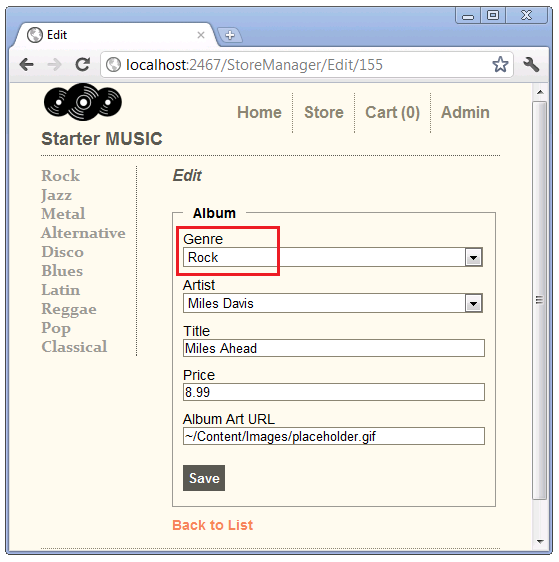
Instead of showing Jazz as the currently selected genre, Rock is displayed. When the string argument (the property to bind) and the SelectList object have the same name, the selected value is not used. When there is no selected value provided, browsers default to the first element in the SelectList(which is Rock in the example above). This is a known limitation of the DropDownList helper.
Open the Controllers.cs file and change the SelectList object names to Genres and Artists. The completed code is shown below:
[!code-csharpMain]
1: private void SetGenreArtistViewBag(int? GenreID = null, int? ArtistID = null) {
2: if (GenreID == null)
3:
4: ViewBag.Genres = new SelectList(db.Genres, "GenreId", "Name");
5:
6: else
7:
8: ViewBag.Genres = new SelectList(db.Genres.ToArray(), "GenreId", "Name", GenreID);
9:
10: if (ArtistID == null)
11:
12: ViewBag.Artists = new SelectList(db.Artists, "ArtistId", "Name");
13:
14: else
15:
16: ViewBag.Artists = new SelectList(db.Artists, "ArtistId", "Name", ArtistID);
17:
18: }
The names Genres and Artists are better names for the categories, as they contain more than just the ID of each category. The refactoring we did earlier paid off. Instead of changing the ViewBag in four methods, our changes were isolated to the SetGenreArtistViewBag method.
Change the DropDownList call in the create and edit views to use the new SelectList names. The new markup for the edit view is shown below:
[!code-cshtmlMain]
1: <div class="editor-label">
2:
3: @Html.LabelFor(model => model.GenreId, "Genre")
4:
5: </div>
6:
7: <div class="editor-field">
8:
9: @Html.DropDownList("GenreId", ViewBag.Genres as SelectList)
10:
11: @Html.ValidationMessageFor(model => model.GenreId)
12:
13: </div>
14:
15: <div class="editor-label">
16:
17: @Html.LabelFor(model => model.ArtistId, "Artist")
18:
19: </div>
20:
21: <div class="editor-field">
22:
23: @Html.DropDownList("ArtistId", ViewBag.Artists as SelectList)
24:
25: @Html.ValidationMessageFor(model => model.ArtistId)
26:
27: </div>
The Create view requires an empty string to prevent the first item in the SelectList from being displayed.
[!code-cshtmlMain]
1: <div class="editor-label">
2:
3: @Html.LabelFor(model => model.GenreId, "Genre" )
4:
5: </div>
6:
7: <div class="editor-field">
8:
9: @Html.DropDownList("GenreId", ViewBag.Genres as SelectList, String.Empty)
10:
11: @Html.ValidationMessageFor(model => model.GenreId)
12:
13: </div>
14:
15: <div class="editor-label">
16:
17: @Html.LabelFor(model => model.ArtistId, "Artist")
18:
19: </div>
20:
21: <div class="editor-field">
22:
23: @Html.DropDownList("ArtistId", ViewBag.Artists as SelectList, String.Empty)
24:
25: @Html.ValidationMessageFor(model => model.ArtistId)
26:
27: </div>
Create a new album and edit an album to verify the changes work. Test the edit code by selecting an album with a genre other than Rock.
Using a View Model with the DropDownList Helper
Create a new class in the ViewModels folder named AlbumSelectListViewModel. Replace the code in the AlbumSelectListViewModel class with the following:
[!code-csharpMain]
1: using MvcMusicStore.Models;
2:
3: using System.Web.Mvc;
4:
5: using System.Collections;
6:
7: namespace MvcMusicStore.ViewModels {
8:
9: public class AlbumSelectListViewModel {
10:
11: public Album Album { get; private set; }
12:
13: public SelectList Artists { get; private set; }
14:
15: public SelectList Genres { get; private set; }
16:
17: public AlbumSelectListViewModel(Album album,
18:
19: IEnumerable artists,
20:
21: IEnumerable genres) {
22:
23: Album = album;
24:
25: Artists = new SelectList(artists, "ArtistID", "Name", album.ArtistId);
26:
27: Genres = new SelectList(genres, "GenreID", "Name", album.GenreId);
28:
29: }
30:
31: }
32:
33: }
The AlbumSelectListViewModel constructor takes an album, a list of artists and genres and creates an object containing the album and a SelectList for genres and artists.
Build the project so the AlbumSelectListViewModel is available when we create a view in the next step.
Add an EditVM method to the StoreManagerController. The completed code is shown below.
[!code-csharpMain]
1: //
2:
3: // GET: /StoreManager/EditVM/5
4:
5: public ActionResult EditVM(int id) {
6:
7: Album album = db.Albums.Find(id);
8:
9: if (album == null)
10:
11: return HttpNotFound();
12:
13: AlbumSelectListViewModel aslvm = new AlbumSelectListViewModel(album, db.Artists, db.Genres);
14:
15: return View(aslvm);
16:
17: }
Right click AlbumSelectListViewModel, select Resolve, then using MvcMusicStore.ViewModels;.
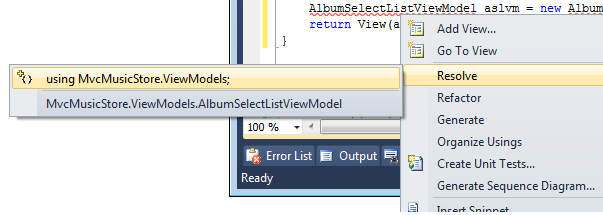
Alternatively, you can add the following using statement:
[!code-csharpMain]
1: using MvcMusicStore.ViewModels;
Right click EditVM and select Add View. Use the options shown below.

Select Add, then replace the contents of the Views.cshtml file with the following:
[!code-cshtmlMain]
1: @model MvcMusicStore.ViewModels.AlbumSelectListViewModel
2:
3: @{
4:
5: ViewBag.Title = "EditVM";
6:
7: }
8:
9: <h2>Edit VM</h2>
10:
11: @using (Html.BeginForm("Edit","StoreManager",FormMethod.Post)) {
12:
13: @Html.ValidationSummary(true)
14:
15: <fieldset>
16:
17: <legend>Album</legend>
18:
19: @Html.HiddenFor(model => model.Album.AlbumId )
20:
21: <div class="editor-label">
22:
23: @Html.LabelFor(model => model.Album.GenreId, "Genre")
24:
25: </div>
26:
27: <div class="editor-field">
28:
29: @Html.DropDownList("Album.GenreId", Model.Genres)
30:
31: @Html.ValidationMessageFor(model => model.Album.GenreId)
32:
33: </div>
34:
35: <div class="editor-label">
36:
37: @Html.LabelFor(model => model.Album.ArtistId, "Artist")
38:
39: </div>
40:
41: <div class="editor-field">
42:
43: @Html.DropDownList("Album.ArtistId", Model.Artists)
44:
45: @Html.ValidationMessageFor(model => model.Album.ArtistId)
46:
47: </div>
48:
49: <div class="editor-label">
50:
51: @Html.LabelFor(model => model.Album.Title)
52:
53: </div>
54:
55: <div class="editor-field">
56:
57: @Html.EditorFor(model => model.Album.Title)
58:
59: @Html.ValidationMessageFor(model => model.Album.Title)
60:
61: </div>
62:
63: <div class="editor-label">
64:
65: @Html.LabelFor(model => model.Album.Price)
66:
67: </div>
68:
69: <div class="editor-field">
70:
71: @Html.EditorFor(model => model.Album.Price)
72:
73: @Html.ValidationMessageFor(model => model.Album.Price)
74:
75: </div>
76:
77: <div class="editor-label">
78:
79: @Html.LabelFor(model => model.Album.AlbumArtUrl)
80:
81: </div>
82:
83: <div class="editor-field">
84:
85: @Html.EditorFor(model => model.Album.AlbumArtUrl)
86:
87: @Html.ValidationMessageFor(model => model.Album.AlbumArtUrl)
88:
89: </div>
90:
91: <p>
92:
93: <input type="submit" value="Save" />
94:
95: </p>
96:
97: </fieldset>
98:
99: }
100:
101: <div>
102:
103: @Html.ActionLink("Back to List", "Index")
104:
105: </div>
The EditVM markup is very similar to the original Edit markup with the following exceptions.
- Model properties in the
Editview are of the formmodel.property(for example,model.Title). Model properties in theEditVmview are of the formmodel.Album.property(for example,model.Album.Title). That???s because theEditVMview is passed a container for anAlbum, not anAlbumas in theEditview. - The DropDownList second parameter comes from the view model, not the ViewBag.
- The BeginForm helper in the
EditVMview explicitly posts back to theEditaction method. By posting back to theEditaction, we don???t have to write anHTTP POST EditVMaction and can reuse theHTTP POSTEditaction.
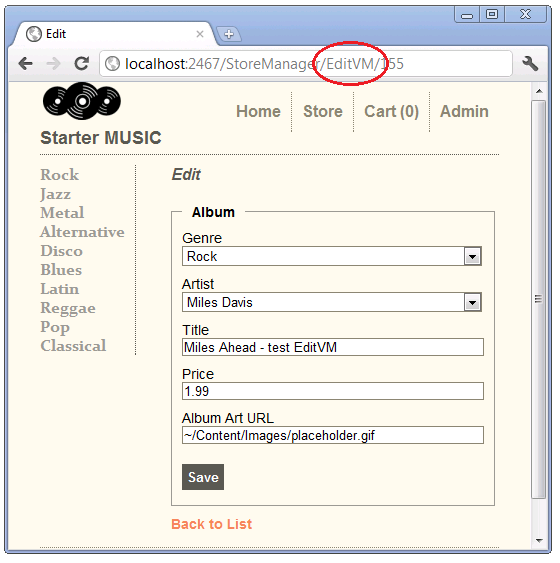
Run the application and edit an album. Change the URL to use EditVM. Change a field and hit the Save button to verify the code is working.
Which Approach Should You Use?
All three approaches shown are acceptible. Many developers prefer to explictily pass the SelectList to the DropDownList using the ViewBag. This approach has the added advantage of giving you the flexibility of using a more appropriate name for the collection. The one caveat is you cannot name the ViewBag SelectList object the same name as the model property.
Some developers prefer the ViewModel approach. Others consider the the more verbose markup and generated HTML of the ViewModel approach a disadvantage.
In this section we have learned three approaches to using the DropDownList with category data. In the next section, we???ll show how to add a new category.
 )
)
|
|