Using the TagBuilder Class to Build HTML Helpers (C#)
Stephen Walther introduces you to a useful utility class in the ASP.NET MVC framework named the TagBuilder class. You can use the TagBuilder class to easily build HTML tags.
The ASP.NET MVC framework includes a useful utility class named the TagBuilder class that you can use when building HTML helpers. The TagBuilder class, as the name of the class suggests, enables you to easily build HTML tags. In this brief tutorial, you are provided with an overview of the TagBuilder class and you learn how to use this class when building a simple HTML helper that renders HTML <img> tags.
Overview of the TagBuilder Class
The TagBuilder class is contained in the System.Web.Mvc namespace. It has five methods:
- AddCssClass() - Enables you to add a new class=“” attribute to a tag.
- GenerateId() - Enables you to add an id attribute to a tag. This method automatically replaces periods in the id (by default, periods are replaced by underscores)
- MergeAttribute() - Enables you to add attributes to a tag. There are multiple overloads of this method.
- SetInnerText() - Enables you to set the inner text of the tag. The inner text is HTML encode automatically.
- ToString() - Enables you to render the tag. You can specify whether you want to create a normal tag, a start tag, an end tag, or a self-closing tag.
The TagBuilder class has four important properties:
- Attributes - Represents all of the attributes of the tag.
- IdAttributeDotReplacement - Represents the character used by the GenerateId() method to replace periods (the default is an underscore).
- InnerHTML - Represents the inner contents of the tag. Assigning a string to this property does not HTML encode the string.
- TagName - Represents the name of the tag.
These methods and properties give you all of the basic methods and properties that you need to build up an HTML tag. You don’t really need to use the TagBuilder class. You could use a StringBuilder class instead. However, the TagBuilder class makes your life a little easier.
Creating an Image HTML Helper
When you create an instance of the TagBuilder class, you pass the name of the tag that you want to build to the TagBuilder constructor. Next, you can call methods like the AddCssClass and MergeAttribute() methods to modify the attributes of the tag. Finally, you call the ToString() method to render the tag.
For example, Listing 1 contains an Image HTML helper. The Image helper is implemented internally with a TagBuilder that represents an HTML <img> tag.
Listing 1 - Helpers.cs
[!code-csharpMain]
1: using System.Web.Mvc;
2: using System.Web.Routing;
3:
4: namespace MvcApplication1.Helpers
5: {
6: public static class ImageHelper
7: {
8: public static string Image(this HtmlHelper helper, string id, string url, string alternateText)
9: {
10: return Image(helper, id, url, alternateText, null);
11: }
12:
13: public static string Image(this HtmlHelper helper, string id, string url, string alternateText, object htmlAttributes)
14: {
15: // Create tag builder
16: var builder = new TagBuilder("img");
17:
18: // Create valid id
19: builder.GenerateId(id);
20:
21: // Add attributes
22: builder.MergeAttribute("src", url);
23: builder.MergeAttribute("alt", alternateText);
24: builder.MergeAttributes(new RouteValueDictionary(htmlAttributes));
25:
26: // Render tag
27: return builder.ToString(TagRenderMode.SelfClosing);
28: }
29:
30: }
31: }
The class in Listing 1 contains two static overloaded methods named Image. When you call the Image() method, you can pass an object which represents a set of HTML attributes or not.
Notice how the TagBuilder.MergeAttribute() method is used to add individual attributes such as the src attribute to the TagBuilder. Notice, furthermore, how the TagBuilder.MergeAttributes() method is used to add a collection of attributes to the TagBuilder. The MergeAttributes() method accepts a Dictionary<string,object> parameter. The The RouteValueDictionary class is used to convert the Object representing the collection of attributes into a Dictionary<string,object>.
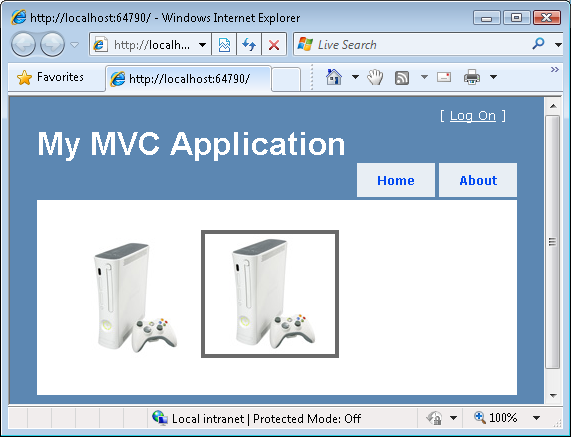
After you create the Image helper, you can use the helper in your ASP.NET MVC views just like any of the other standard HTML helpers. The view in Listing 2 uses the Image helper to display the same image of an Xbox twice (see Figure 1). The Image() helper is called both with and without an HTML attribute collection.
Listing 2 - Home.aspx
[!code-aspxMain]
1: <%@ Page Language="C#" MasterPageFile="~/Views/Shared/Site.Master" Inherits="System.Web.Mvc.ViewPage" %>
2: <%@ Import Namespace="MvcApplication1.Helpers" %>
3:
4: <asp:Content ID="indexContent" ContentPlaceHolderID="MainContent" runat="server">
5:
6: <!-- Calling helper without HTML attributes -->
7: <%= Html.Image("img1", ResolveUrl("~/Content/XBox.jpg"), "XBox Console") %>
8:
9: <!-- Calling helper with HTML attributes -->
10: <%= Html.Image("img1", ResolveUrl("~/Content/XBox.jpg"), "XBox Console", new {border="4px"})%>
11:
12: </asp:Content>

Figure 01: Using the Image helper(Click to view full-size image)
Notice that you must import the namespace associated with the Image helper at the top of the Index.aspx view. The helper is imported with the following directive:
[!code-aspxMain]
1: <%@ Import Namespace="MvcApplication1.Helpers" %>
 )
)
|
|