Adding ASP.NET Identity to an Empty or Existing Web Forms Project
This tutorial shows you how to add ASP.NET Identity (the new membership system for ASP.NET) to an ASP.NET application.
When you create a new Web Forms or MVC project in Visual Studio 2013 RTM with Individual Accounts, Visual Studio will install all the required packages and add all necessary classes for you. This tutorial will illustrate the steps to add ASP.NET Identity support to your existing Web Forms project or a new empty project. I will outline all the NuGet packages you need to install, and classes you need to add. I will go over sample Web Forms for registering new users and logging in while highlighting all main entry point APIs for user management and authentication. This sample will use the ASP.NET Identity default implementation for SQL data storage which is built on Entity Framework. This tutorial, we will use LocalDB for the SQL database.
This tutorial was written by Raquel Soares De Almeida and Rick Anderson ( [@RickAndMSFT](https://twitter.com/#!/RickAndMSFT) ).
Getting Started ASP.NET Identity
- Start by installing and running Visual Studio Express 2013 for Web or Visual Studio 2013.
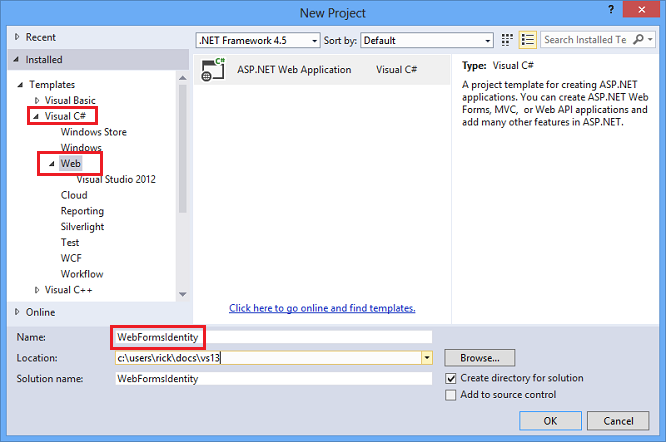
- Click New Project from the Start page, or you can use the menu and select File, and then New Project.
Select Visual C# i n the left pane, then Web and then select ASP.NET Web Application. Name your project “WebFormsIdentity” and then click OK.
In the New ASP.NET Project dialog, select the Empty template.
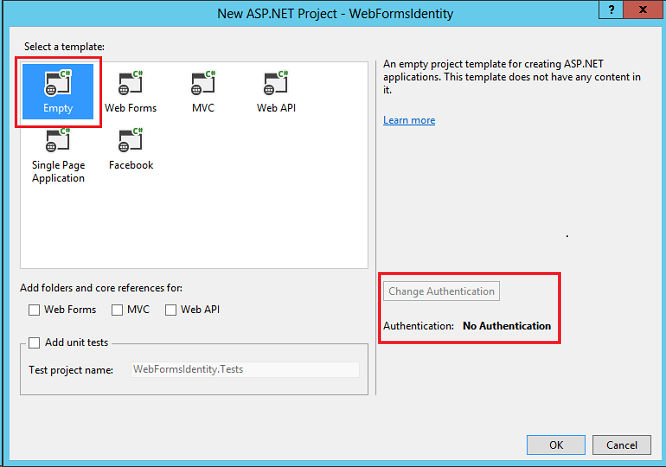
Notice the Change Authentication button is disabled and no authentication support is provided in this template. The Web Forms, MVC and Web API templates allow you to select the authentication approach. For more information, see Overview of Authentication .
Adding Identity Packages to your App
In Solution Explorer, right-click your project and select Manage NuGet Packages. In the search text box dialog, type “Identity.E”. Click install for this package.

Note that this package will install the dependency packages: EntityFramework and Microsoft ASP.NET Identity Core.
Adding Web Forms to Register Users
In Solution Explorer, right-click your project and click Add, and then Web Form.
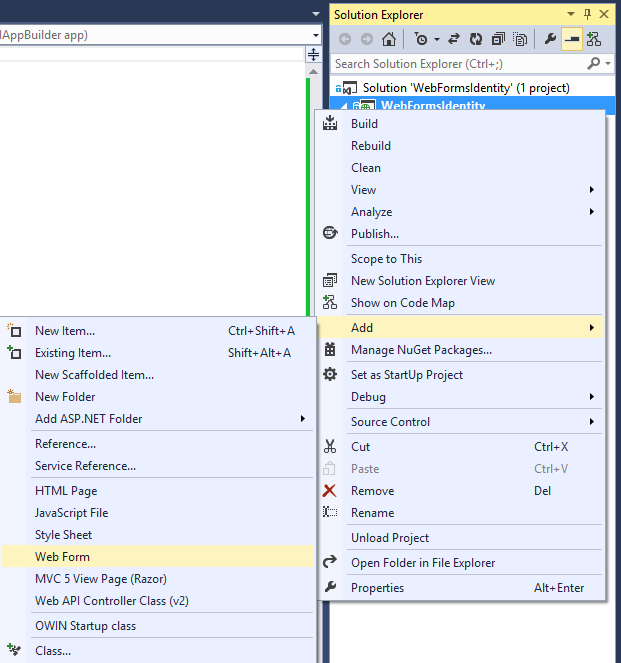
- In the Specify Name for Item dialog box, name the new web form Register, and then click OK
Replace the markup in the generated Register.aspx file with the code below. The code changes are highlighted.
[!code-aspxMain]
1: <%@ Page Language="C#" AutoEventWireup="true" CodeBehind="Register.aspx.cs" Inherits="WebFormsIdentity.Register" %>
2:3: <!DOCTYPE html>
4:5: <html xmlns="http://www.w3.org/1999/xhtml">
6: <head runat="server">
7: <title></title>
8: </head>
9: <body style="font-family: Arial, Helvetica, sans-serif; font-size: small">
10: <form id="form1" runat="server">
11: <div>
12: <h4 style="font-size: medium">Register a new user</h4>
13: <hr />
14: <p>
15: <asp:Literal runat="server" ID="StatusMessage" />
16: </p>
17: <div style="margin-bottom:10px">
18: <asp:Label runat="server" AssociatedControlID="UserName">User name</asp:Label>
19: <div>
20: <asp:TextBox runat="server" ID="UserName" />
21: </div>
22: </div>
23: <div style="margin-bottom:10px">
24: <asp:Label runat="server" AssociatedControlID="Password">Password</asp:Label>
25: <div>
26: <asp:TextBox runat="server" ID="Password" TextMode="Password" />
27: </div>
28: </div>
29: <div style="margin-bottom:10px">
30: <asp:Label runat="server" AssociatedControlID="ConfirmPassword">Confirm password</asp:Label>
31: <div>
32: <asp:TextBox runat="server" ID="ConfirmPassword" TextMode="Password" />
33: </div>
34: </div>
35: <div>
36: <div>
37: <asp:Button runat="server" OnClick="CreateUser_Click" Text="Register" />
38: </div>
39: </div>
40: </div>
41: </form>
42: </body>
43: </html>
[!NOTE] This is just a simplified version of the Register.aspx file that is created when you create a new ASP.NET Web Forms project. The markup above adds form fields and a button to register a new user.
Open the Register.aspx.cs file and replace the contents of the file with the following code:
[!code-csharpMain]
1: using Microsoft.AspNet.Identity;
2: using Microsoft.AspNet.Identity.EntityFramework;
3: using System;
4: using System.Linq;
5:6: namespace WebFormsIdentity
7: {8: public partial class Register : System.Web.UI.Page
9: {10: protected void CreateUser_Click(object sender, EventArgs e)
11: {12: // Default UserStore constructor uses the default connection string named: DefaultConnection
13: var userStore = new UserStore<IdentityUser>();
14: var manager = new UserManager<IdentityUser>(userStore);
15:16: var user = new IdentityUser() { UserName = UserName.Text };
17: IdentityResult result = manager.Create(user, Password.Text);18:19: if (result.Succeeded)
20: {21: StatusMessage.Text = string.Format("User {0} was created successfully!", user.UserName);
22: }23: else
24: {25: StatusMessage.Text = result.Errors.FirstOrDefault();26: }27: }28: }29: }[!NOTE]
- The code above is a simplified version of the Register.aspx.cs file that is created when you create a new ASP.NET Web Forms project.
- The IdentityUser class is the default EntityFramework implementation of the IUser interface. IUser interface is the minimal interface for a user on ASP.NET Identity Core.
- The UserStore class is the default EntityFramework implementation of a user store. This class implements the ASP.NET Identity Core’s minimal interfaces: IUserStore, IUserLoginStore, IUserClaimStore and IUserRoleStore.
- The UserManager class exposes user related APIs which will automatically save changes to the UserStore.
- The IdentityResult class represents the result of an identity operation.
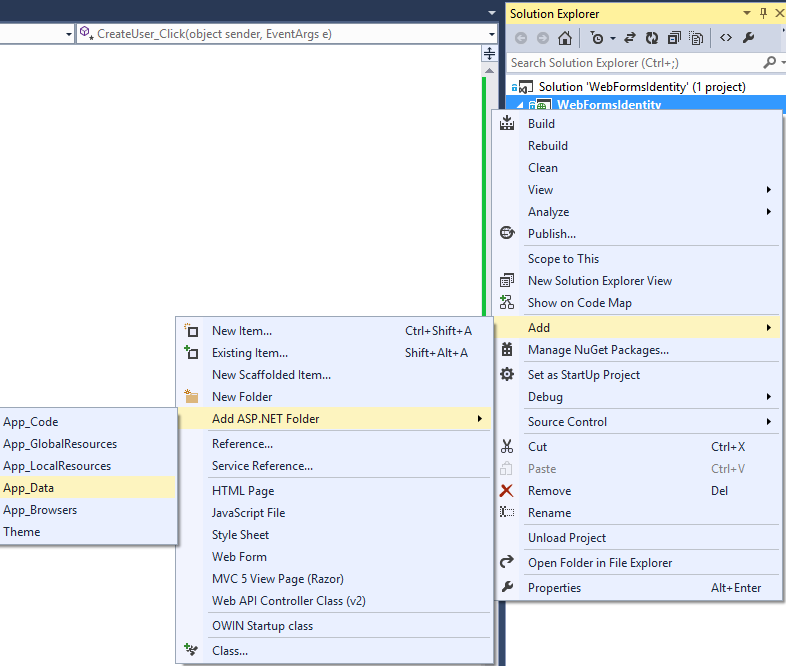
In Solution Explorer, right-click your project and click Add, Add ASP.NET Folder and then App_Data.
Open the Web.config file and add a connection string entry for the database we will use to store user information. The database will be created at runtime by EntityFramework for the Identity entities. The connection string is similar to one created for you when you create a new Web Forms project. The highlighted code shows the markup you should add:
[!code-xmlMain]
1: <?xml version="1.0" encoding="utf-8"?>
2: <!--
3: For more information on how to configure your ASP.NET application, please visit
4: http://go.microsoft.com/fwlink/?LinkId=169433
5: -->
6: <configuration>
7: <configSections>
8: <!-- For more information on Entity Framework configuration, visit http://go.microsoft.com/fwlink/?LinkID=237468 -->
9: <section name="entityFramework" type="System.Data.Entity.Internal.ConfigFile.EntityFrameworkSection, EntityFramework, Version=6.0.0.0, Culture=neutral, PublicKeyToken=b77a5c561934e089" requirePermission="false" />
10: </configSections>
11: <connectionStrings>
12: <add name="DefaultConnection" connectionString="Data Source=(LocalDb)\v11.0;AttachDbFilename=|DataDirectory|\WebFormsIdentity.mdf;Initial Catalog=WebFormsIdentity;Integrated Security=True"
13: providerName="System.Data.SqlClient" />
14: </connectionStrings>
15: <system.web>
16: <compilation debug="true" targetFramework="4.5" />
17: <httpRuntime targetFramework="4.5" />
18: </system.web>
19: <entityFramework>
20: <defaultConnectionFactory type="System.Data.Entity.Infrastructure.LocalDbConnectionFactory, EntityFramework">
21: <parameters>
22: <parameter value="v11.0" />
23: </parameters>
24: </defaultConnectionFactory>
25: <providers>
26: <provider invariantName="System.Data.SqlClient" type="System.Data.Entity.SqlServer.SqlProviderServices, EntityFramework.SqlServer" />
27: </providers>
28: </entityFramework>
29: </configuration>
[!NOTE] For Visual Studio 2015 or higher, replace
(localdb)\v11.0with(localdb)\MSSQLLocalDBin your connection string.Right click file Register.aspx in your project and select Set as Start Page. Press Ctrl + F5 to build and run the web application. Enter a new user name and password and then click on Register.

[!NOTE] ASP.NET Identity has support for validation and in this sample you can verify the default behavior on User and Password validators that come from the Identity Core package. The default validator for User (
UserValidator) has a propertyAllowOnlyAlphanumericUserNamesthat has default value set totrue. The default validator for Password (MinimumLengthValidator) ensures that password has at least 6 characters. These validators are properties onUserManagerthat can be overridden if you want to have custom validation,
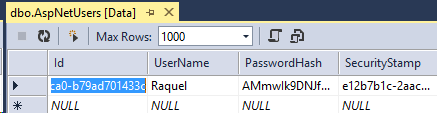
Verifying the LocalDb Identity Database and Tables Generated by Entity Framework
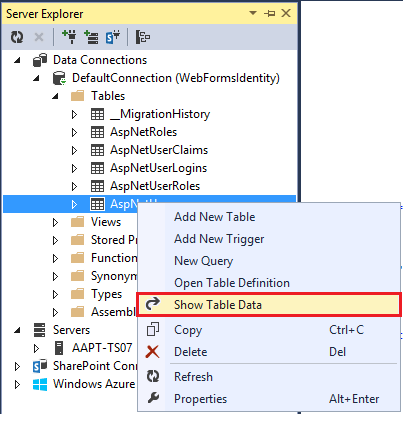
In the View menu, click Server Explorer.
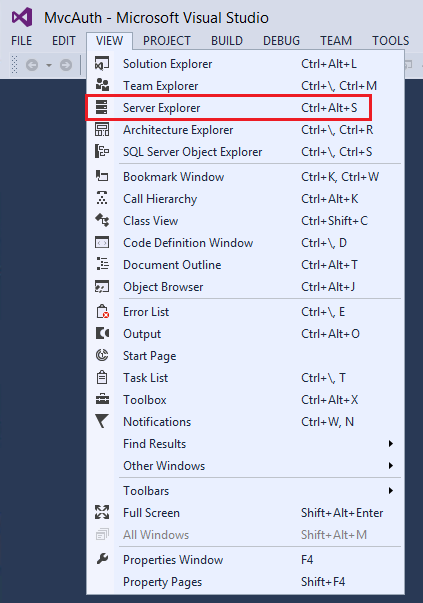
Expand DefaultConnection (WebFormsIdentity), expand Tables, right click AspNetUsers and click Show Table Data.
Configuring the application for OWIN authentication
At this point we have only added support for creating users. Now, we are going to demonstrate how we can add authentication to login a user. ASP.NET Identity uses Microsoft OWIN Authentication middleware for forms authentication. The OWIN Cookie Authentication is a cookie and claims based authentication mechanism that can be used by any framework hosted on OWIN or IIS. With this model, the same authentication packages can be used across multiple frameworks including ASP.NET MVC and Web Forms. For more information on project Katana and how to run middleware in a host agnostic see Getting Started with the Katana Project.
Installing authentication packages to your application
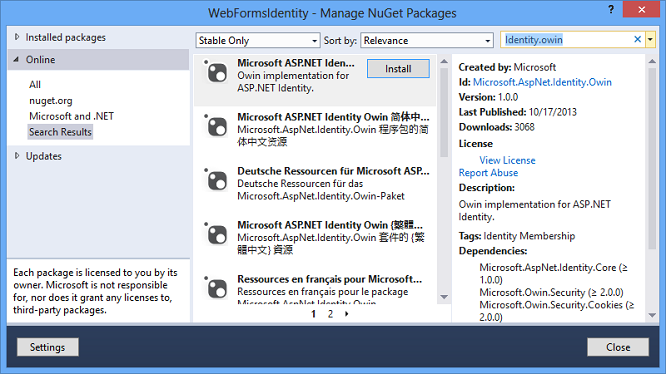
In Solution Explorer, right-click your project and select Manage NuGet Packages. In the search text box dialog, type “Identity.Owin”. Click install for this package.
Search for package Microsoft.Owin.Host.SystemWeb and install it.
[!NOTE] The Microsoft.Aspnet.Identity.Owin package contains a set of OWIN extension classes to manage and configure OWIN authentication middleware to be consumed by ASP.NET Identity Core packages.
The Microsoft.Owin.Host.SystemWeb package contains an OWIN server that enables OWIN-based applications to run on IIS using the ASP.NET request pipeline. For more information see OWIN Middleware in the IIS integrated pipeline.
Adding OWIN Startup and Authentication Configuration Classes
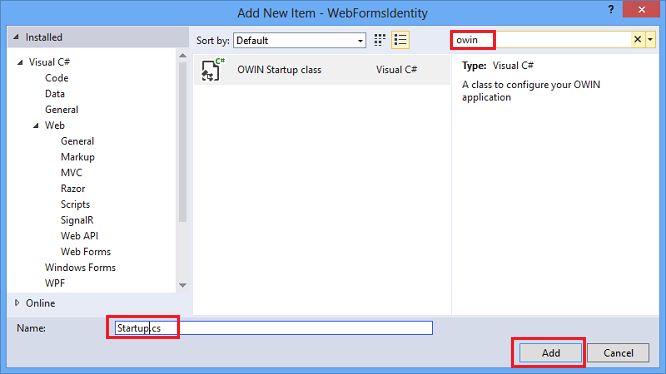
In Solution Explorer, right-click your project, click Add, and then Add New Item. In the search text box dialog, type “owin”. Name the class “Startup” and click Add.
In the Startup.cs file, add the highlighted code shown below to configure OWIN cookie authentication.
[!code-csharpMain]
1: using Microsoft.AspNet.Identity;
2: using Microsoft.Owin;
3: using Microsoft.Owin.Security.Cookies;
4: using Owin;
5:6: [assembly: OwinStartup(typeof(WebFormsIdentity.Startup))]
7:8: namespace WebFormsIdentity
9: {10: public class Startup
11: {12: public void Configuration(IAppBuilder app)
13: {14: // For more information on how to configure your application, visit http://go.microsoft.com/fwlink/?LinkID=316888
15: app.UseCookieAuthentication(new CookieAuthenticationOptions
16: {17: AuthenticationType = DefaultAuthenticationTypes.ApplicationCookie,18: LoginPath = new PathString("/Login")
19: });20: }21: }22: }[!NOTE] This class contains the
OwinStartupattribute for specifying the OWIN startup class. Every OWIN application has a startup class where you specify components for the application pipeline. See OWIN Startup Class Detection for more info on this model.
Adding Web Forms for Registering and Logging in Users
Open the Register.cs file and add the following code which will log in the user when registration succeeds. The changes are highlighted below.
[!code-csharpMain]
1: using Microsoft.AspNet.Identity;
2: using Microsoft.AspNet.Identity.EntityFramework;
3: using Microsoft.Owin.Security;
4: using System;
5: using System.Linq;
6: using System.Web;
7:8: namespace WebFormsIdentity
9: {10: public partial class Register : System.Web.UI.Page
11: {12: protected void CreateUser_Click(object sender, EventArgs e)
13: {14: // Default UserStore constructor uses the default connection string named: DefaultConnection
15: var userStore = new UserStore<IdentityUser>();
16: var manager = new UserManager<IdentityUser>(userStore);
17: var user = new IdentityUser() { UserName = UserName.Text };
18:19: IdentityResult result = manager.Create(user, Password.Text);20:21: if (result.Succeeded)
22: {23: var authenticationManager = HttpContext.Current.GetOwinContext().Authentication;24: var userIdentity = manager.CreateIdentity(user, DefaultAuthenticationTypes.ApplicationCookie);25: authenticationManager.SignIn(new AuthenticationProperties() { }, userIdentity);
26: Response.Redirect("~/Login.aspx");
27: }28: else
29: {30: StatusMessage.Text = result.Errors.FirstOrDefault();31: }32: }33: }34: }[!NOTE]
- Since ASP.NET Identity and OWIN Cookie Authentication are claims based system, the framework requires the app developer to generate a ClaimsIdentity for the user. ClaimsIdentity has information about all the claims for the user such as what Roles the user belongs to. You can also add more claims for the user at this stage.
- You can sign in the user by using the AuthenticationManager from OWIN and calling
SignInand passing in the ClaimsIdentity as shown above. This code will sign in the user and generate a cookie as well. This call is analogous to FormAuthentication.SetAuthCookie used by the FormsAuthentication module.
In Solution Explorer, right-click your project click Add, and then Web Form. Name the web form Login.

Replace the contents of the Login.aspx file with the following code:
[!code-aspxMain]1: <%@ Page Language="C#" AutoEventWireup="true" CodeBehind="Login.aspx.cs" Inherits="WebFormsIdentity.Login" %>
2:3: <!DOCTYPE html>
4:5: <html xmlns="http://www.w3.org/1999/xhtml">
6: <head runat="server">
7: <title></title>
8: </head>
9: <body style="font-family: Arial, Helvetica, sans-serif; font-size: small">
10: <form id="form1" runat="server">
11: <div>
12: <h4 style="font-size: medium">Log In</h4>
13: <hr />
14: <asp:PlaceHolder runat="server" ID="LoginStatus" Visible="false">
15: <p>
16: <asp:Literal runat="server" ID="StatusText" />
17: </p>
18: </asp:PlaceHolder>
19: <asp:PlaceHolder runat="server" ID="LoginForm" Visible="false">
20: <div style="margin-bottom: 10px">
21: <asp:Label runat="server" AssociatedControlID="UserName">User name</asp:Label>
22: <div>
23: <asp:TextBox runat="server" ID="UserName" />
24: </div>
25: </div>
26: <div style="margin-bottom: 10px">
27: <asp:Label runat="server" AssociatedControlID="Password">Password</asp:Label>
28: <div>
29: <asp:TextBox runat="server" ID="Password" TextMode="Password" />
30: </div>
31: </div>
32: <div style="margin-bottom: 10px">
33: <div>
34: <asp:Button runat="server" OnClick="SignIn" Text="Log in" />
35: </div>
36: </div>
37: </asp:PlaceHolder>
38: <asp:PlaceHolder runat="server" ID="LogoutButton" Visible="false">
39: <div>
40: <div>
41: <asp:Button runat="server" OnClick="SignOut" Text="Log out" />
42: </div>
43: </div>
44: </asp:PlaceHolder>
45: </div>
46: </form>
47: </body>
48: </html>
Replace the contents of the Login.aspx.cs file with the following:
[!code-csharpMain]
1: using Microsoft.AspNet.Identity;
2: using Microsoft.AspNet.Identity.EntityFramework;
3: using Microsoft.Owin.Security;
4: using System;
5: using System.Web;
6: using System.Web.UI.WebControls;
7:8: namespace WebFormsIdentity
9: {10: public partial class Login : System.Web.UI.Page
11: {12: protected void Page_Load(object sender, EventArgs e)
13: {14: if (!IsPostBack)
15: {16: if (User.Identity.IsAuthenticated)
17: {18: StatusText.Text = string.Format("Hello {0}!!", User.Identity.GetUserName());
19: LoginStatus.Visible = true;
20: LogoutButton.Visible = true;
21: }22: else
23: {24: LoginForm.Visible = true;
25: }26: }27: }28:29: protected void SignIn(object sender, EventArgs e)
30: {31: var userStore = new UserStore<IdentityUser>();
32: var userManager = new UserManager<IdentityUser>(userStore);
33: var user = userManager.Find(UserName.Text, Password.Text);34:35: if (user != null)
36: {37: var authenticationManager = HttpContext.Current.GetOwinContext().Authentication;38: var userIdentity = userManager.CreateIdentity(user, DefaultAuthenticationTypes.ApplicationCookie);39:40: authenticationManager.SignIn(new AuthenticationProperties() { IsPersistent = false }, userIdentity);
41: Response.Redirect("~/Login.aspx");
42: }43: else
44: {45: StatusText.Text = "Invalid username or password.";
46: LoginStatus.Visible = true;
47: }48: }49:50: protected void SignOut(object sender, EventArgs e)
51: {52: var authenticationManager = HttpContext.Current.GetOwinContext().Authentication;53: authenticationManager.SignOut();54: Response.Redirect("~/Login.aspx");
55: }56: }57: }[!NOTE]
- The
Page_Loadnow checks for the status of current user and takes action based on itsContext.User.Identity.IsAuthenticatedstatus.
Display Logged in User Name : The Microsoft ASP.NET Identity Framework has added extension methods on System.Security.Principal.IIdentity that allows you to get theUserNameandUserIdfor the logged in User. These extension methods are defined in theMicrosoft.AspNet.Identity.Coreassembly. These extension methods are the replacement for HttpContext.User.Identity.Name . - SignIn method:
Thismethod replaces the previousCreateUser_Clickmethod in this sample and now signs in the user after successfully creating the user.
The Microsoft OWIN Framework has added extension methods onSystem.Web.HttpContextthat allows you to get a reference to anIOwinContext. These extension methods are defined inMicrosoft.Owin.Host.SystemWebassembly. TheOwinContextclass exposes anIAuthenticationManagerproperty that represents the Authentication middleware functionality available on the current request.
You can sign in the user by using theAuthenticationManagerfrom OWIN and callingSignInand passing in theClaimsIdentityas shown above.
Because ASP.NET Identity and OWIN Cookie Authentication are claims-based system, the framework requires the app to generate aClaimsIdentityfor the user.
TheClaimsIdentityhas information about all the claims for the user, such as what roles the user belongs to. You can also add more claims for the user at this stage
This code will sign in the user and generate a cookie as well. This call is analogous to FormAuthentication.SetAuthCookie used by the FormsAuthentication module. SignOutmethod:
Gets a reference to theAuthenticationManagerfrom OWIN and callsSignOut. This is analogous to FormsAuthentication.SignOut method used by the FormsAuthentication module.
- The
Press Ctrl + F5 to build and run the web application. Enter a new user name and password and then click on Register.
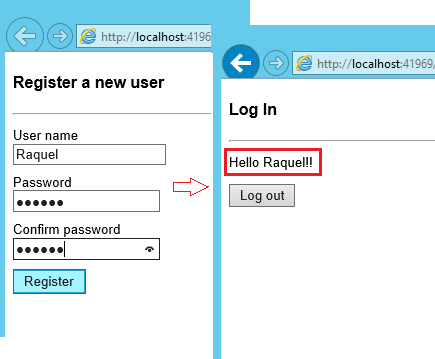
Note: At this point, the new user is created and logged in.- Click on Log out button.You will be redirected to the Log in form.
Enter an invalid user name or password and Click on Log in button.
TheUserManager.Findmethod will return null and the error message: " Invalid user name or password " will be displayed.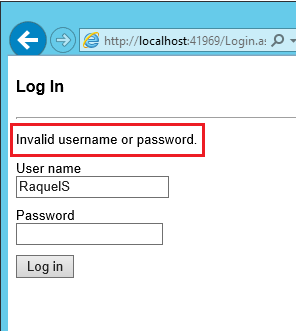
 )
)
|
|